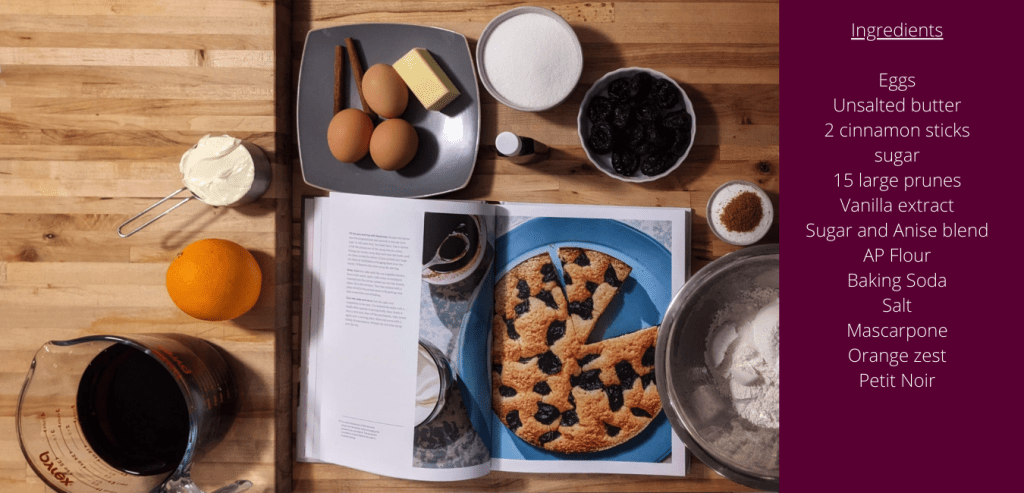
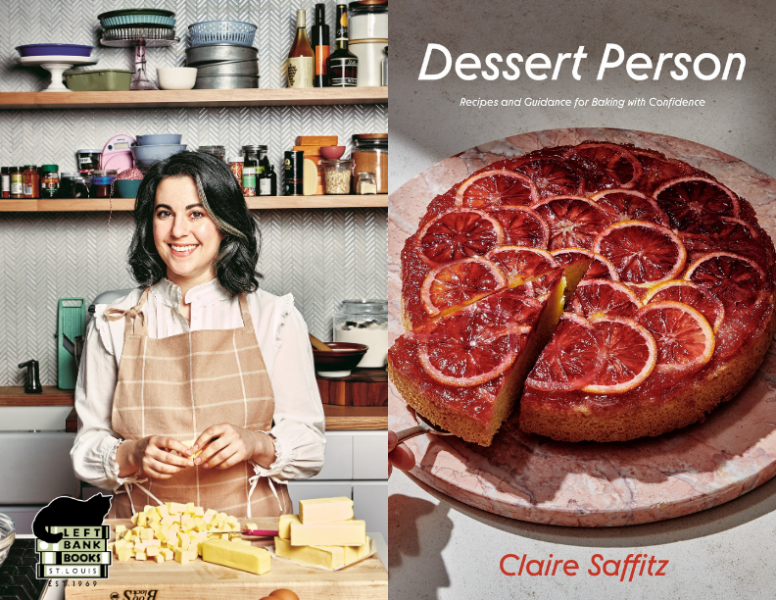
Hello and welcome to the fifth part in my series Baking with Confidence. Baking my way through Claire Saffitz’ “Dessert Person”. My goal is to cook through every recipe in order, slowly making my way through the entire book in one year. The fifth recipe in the book is Mascarpone Cakewith Red Wine Prunes. This is a two part recipe: 1 part batter and 1 part red wine prune reduction.
Claire has managed to stack the odds against me in this recipe. Mostly, because I have the flavor palette of a 5 year old, but prunes and anise? Neither make me very excited to make or try this recipe, but I will for the sake of the challenge! Considering these aren’t flavors I reach for around the house, I’ve tried to only buy as much as I need for the recipe. As a general rule, I try not to have excess of any one ingredient unless it is something I know I will use. Food waste is a big issue in America and I try to limit my food waste by composting. With this recipe I knew buying a whole container of prunes would surely go to waste so what do I do? Text my father.
M: Hey do you have any prunes?
F: I eat prunes. I like prunes. No prunes right now.
Classic father reply! Since he is the only person in my circle that I know eats prunes and I couldn’t barter with him, out to the store I went for prunes and a light red wine. We are unusually low in our wine stock at the moment, but I knew that the prunes and cake would be a lovely gift for my dad. He is a big fan of any slice of bread, pie, or biscuit with a cup of black coffee any time of day.
The first step in this adventure was to reduce red wine, prunes, water, anise, and cinnamon sticks for about an hour until it’s around 1/4 of a cup. This was the perfect amount of time for my eggs and mascarpone to come up to room temp while I measured out the dry ingredients.
Some of the steps in this recipe feel very similar to some others out of the book. Lining a 9 inch pan with butter and parchment. Combing the dry ingredients and then whisking the wet together until it make a nice cream. The tangy sweetness from the mascarpone is a nice touch to a rather classic cake. Claire mentions that once you pour the batter into the pan to arrange the prunes in the batter carefully to make sure not to drip any of the sauce. This of course was my favorite step! Something so fiddly but I love it and yet get so frustrated by it. She also recommends, this I didn’t follow, to slice the large prunes in half, and in hindsight I can see why.
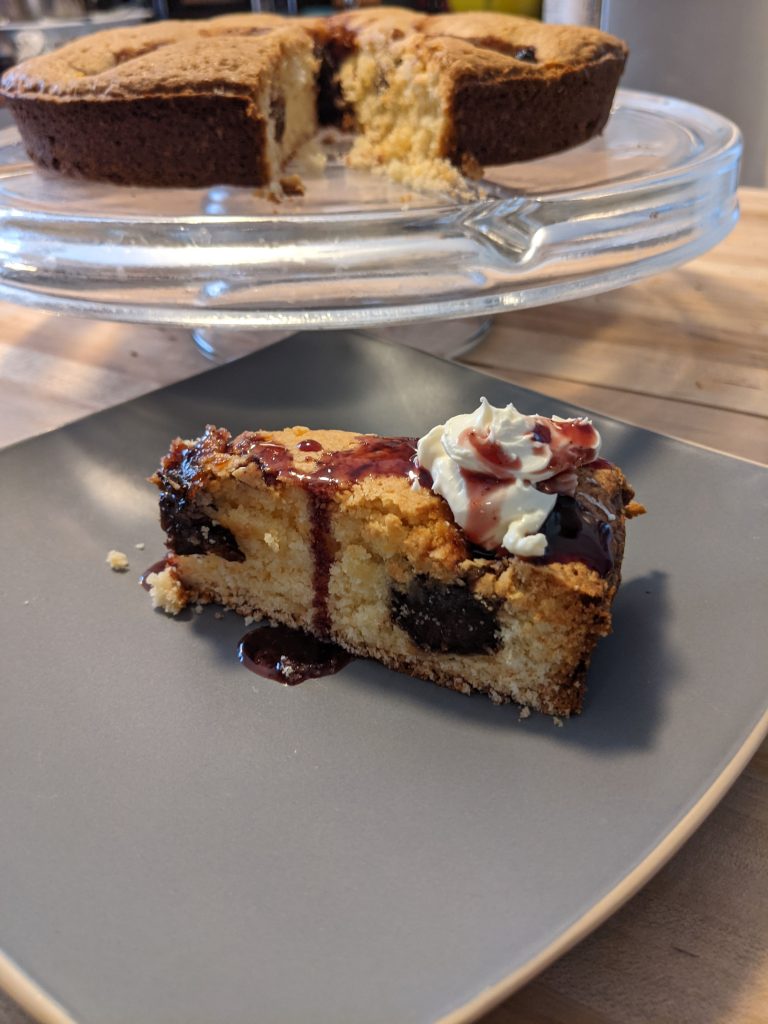
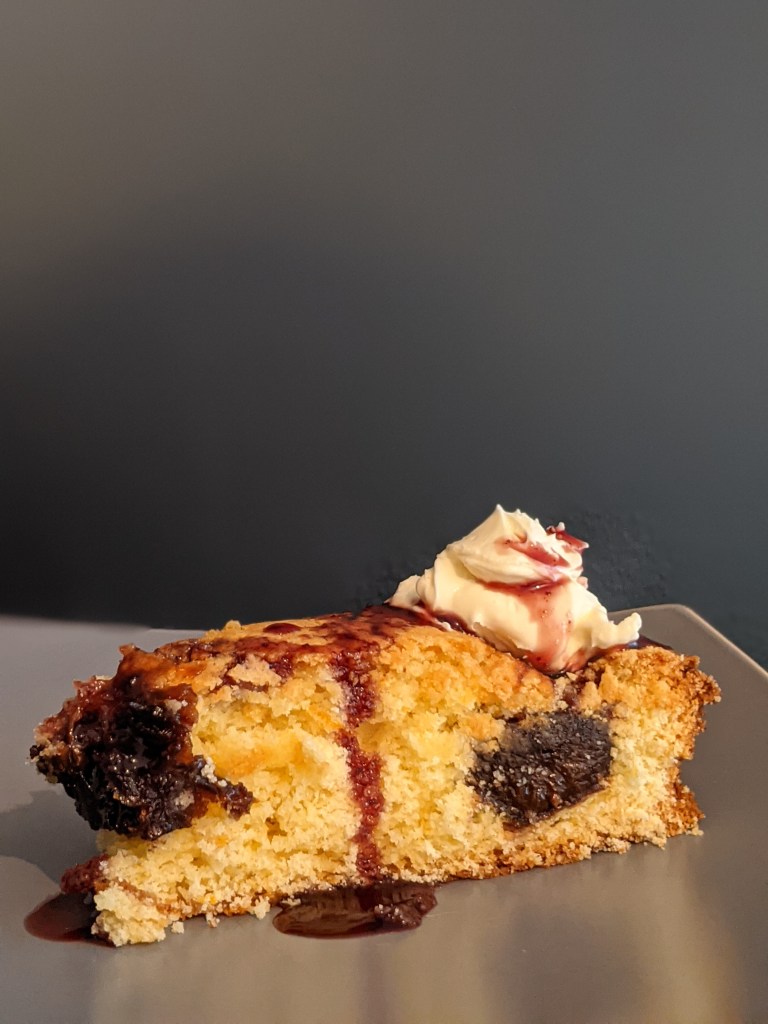
If you want a cake that smells like the holidays make this cake! My whole house smelled like mulled wine. Yum. Between the wine, cinnamon, and orange zest you would have thought it was Christmas time. This cake is absolutely beautiful and would make a great centerpiece at any family function. My personal favorite was plating up this dish. You are instructed to serve the cake with the red wine reduction and mascarpone. Such a pretty plate!
I promptly texted my father and said I have a whole cake minus one piece coming his way shortly, so put a pot of a coffee on! To say he loved this cake would be an understatement. He is a big fan of sweet desserts that almost border on the savory side. I would be interested next time to try steeping the prunes in a red wine sangria mixture. Really lean into the mulled wine Christmas flavors: orange, nutmeg, cardamom, and cloves.
Check out my YouTube video below and follow Natalie Aaron for more.
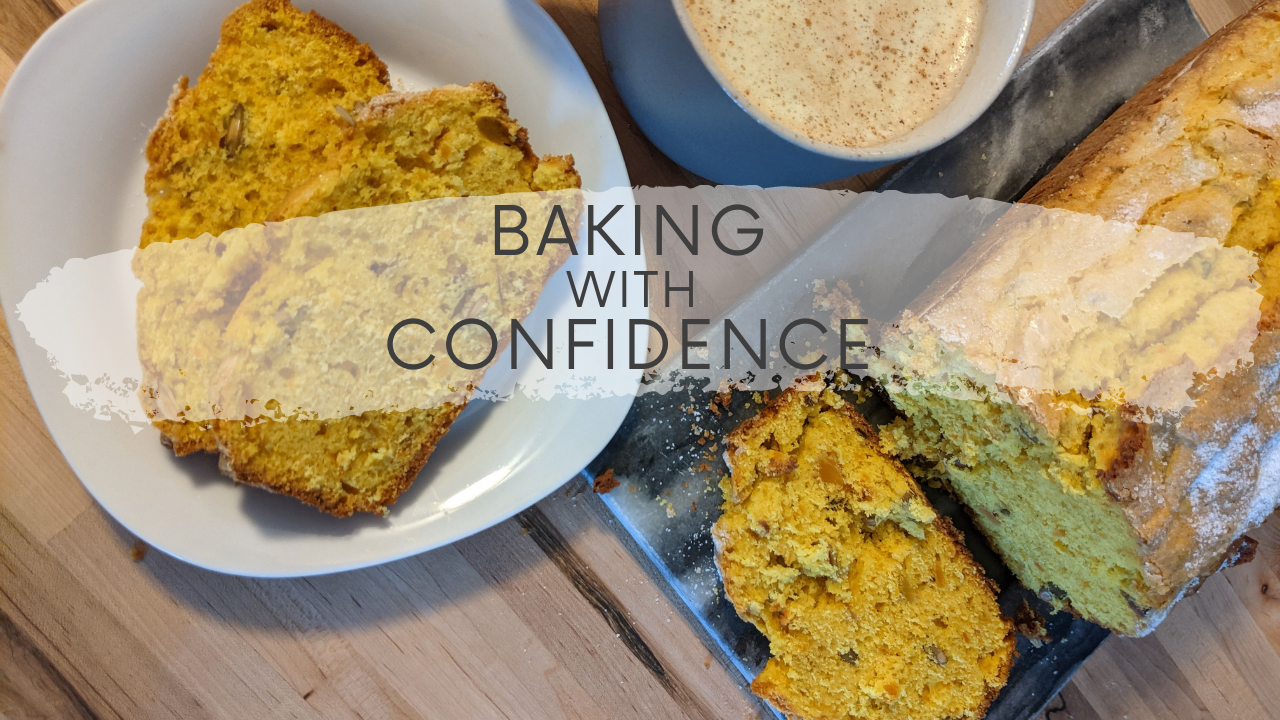
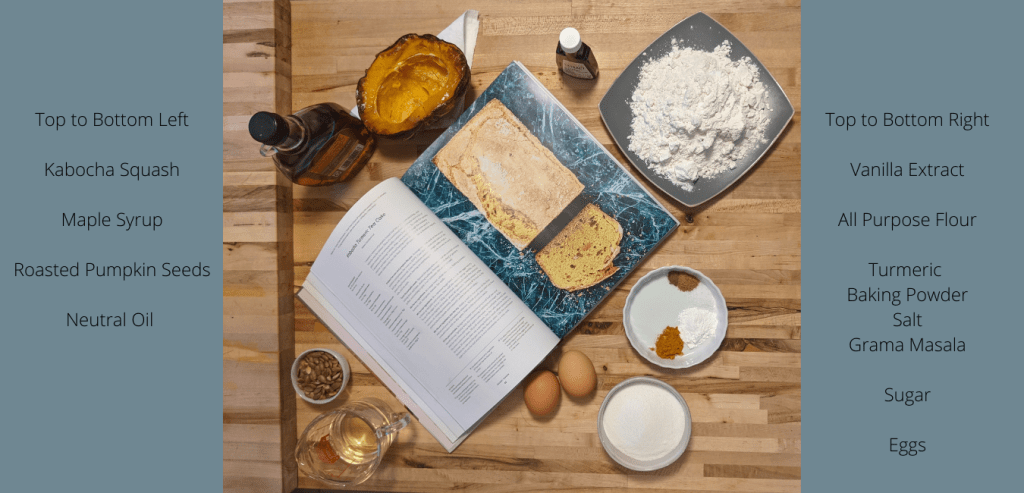
Hello and welcome to the fourth part in my series Baking with Confidence. Baking my way through Claire Saffitz’ “Dessert Person”. My goal is to cook through every recipe in order, slowly making my way through the entire book in one year. The second recipe in the book is Kabocha Turmeric Tea Cake. Claire made this easy for me with a classic recipe but with a new twist. Let’s get into it!
All right guys I am going to be straight up you from the get go, I had no clue what kabocha is, was, or tasted like. When I first read the title of the recipe I thought it said Kombucha, the fermented tea. Which I thought made perfect sense since it was a TEA cake, but my husband quickly read over my shoulder correcting me. This a frequent issue I have (thank goodness he’s tall enough to read over my shoulder), but neither of us knew what this mythical squash was. I bet you we spent about 5 minute going back and forth together guessing different ways to pronounce this hypothetical squash.
After reading through the recipe and now knowing it was not in fact a type of fermented tea that my husband makes in his fermentation station, I had an entirely different path the follow. My first thought was to text my father, the plant man himself and then my mother in law, the plant lady. Whenever I have a question about plants I call or text my father (and so do others in my life) because he is Mr. Granola (in the very best way!). Being the anti-tech man he is, his reply took a few days and was as simple as they come.
F: Nope. Never heard of it.
I then proceeded to text my mother in law, but here is where so many funny moments in my life happen. My mother in law and boss have the same name, luckily I have a great friendship with my boss so it makes these conversation less embarrassing. I am sure you can see where I am going with this, but I text my boss asking about a squash. Being the wonderful woman she is she thoughtfully replied.
Boss: Nope, never heard of it! But let me know when you do.
After my amusing conversation with my boss I made sure to text my mother in law and with the way things were going you’ll probably guess she had never heard of it either. After this run around I then decided to do a google search, (some of you might have wondered why I didn’t start there, I know my husband does). I can’t explain it one way or another, but sometimes asking others is the best source of information over Google. Diving into the recipe, I hoped Claire would explain more about the mysterious squash-that-isn’t-fermented-tea, but all I could gather was her thought process behind creating this wonderful twist to a classic recipe.
Claire says that this is her personal twist on the very widely loved (looking at you starbucks) pumpkin bread. Now, pumpkin bread holds a very high place in my heart. My grandmother made me pumpkin bread my whole life. She lived in Florida and when she would fly up to visit me she would make three or four loaves, freeze them, and then stock up my freezer. I would then ration it out until the next time I saw her. To this date I still can’t make pumpkin bread quite as good as her. Claire does mention in her notes that you can substitute the kabocha squash for canned pumpkin if that’s what you have on hand.
Discovering that the mystical squash comes from east Asia, I couldn’t wipe the grin off my face. My husband knew this meant a special trip to a store near and dear to my heart. The reason out local Asian grocery store means so much to me stems from childhood trips there with my father. He was the chef in the house growing up and cooked a lot of tofu-based, asianiinspired dishes. Almost every week we’d go to the local Asian market and restock. To folks who don’t frequent Asian markets, the specific smell (especially stores with fresh fish markets, like ours) can be off-putting, but to me it nostalgic. Taking a deep breath (through our face masks of course), we raided the store for all it’s delicious spices, fresh produce, and snacks. Full of shrimp and seaweed chips we returned home with the elusive kabocha squash!
As a self proclaimed professional at home chef I actual have a lot of thoughts about this recipe. I feel like I could test multiple different variations before settling on a recipe I best prefer. With that being said, I will be adding my changes to the recipe, but like always I am trying my best to stick closely to the recipe at hand. Claire states to roast the squash whole on an oiled pan for 50-60 minutes. I would lightly season with salt and pepper or maybe put some light aromatics in the pan next time. If you have never cooked fresh pumpkin or similar squashes you will discover that they have a very mild flavor. This carries over into the overall recipe.
I always try to start by having my ingredients prepared (mise en place if you watch too much cooking channel), again, this is the best thing you can do for yourself in the kitchen. Prep your ingredients in advance because throwing together the batter goes so fast and you’re in and out of the kitchen before you know it! Seeing my ingredients in front of me again makes me wonder if maybe glazing the raw squash with maple syrup before roasting might have been an interesting alternative.
From the list above you can see some spices you might not have in your spice drawer. Don’t fret because I have the answer! Turmeric is a lovely spice and adds the earthy warmth and beautiful golden coloring to this cake, but if you don’t have turmeric feel free to use the following spices: saffron, or a combination of ginger and cumin. As for Garam Masala, it can be substituted for something more common such as cinnamon or a combination of cumin and allspice. These two spices are very common in Indian and Thai dishes, if you have never had a curry before I’d highly recommend making some time for a delicious dinner. I have a food allergy to coriander/cilantro which are included in Garam Masala, so I used the alternatives as a replacement.
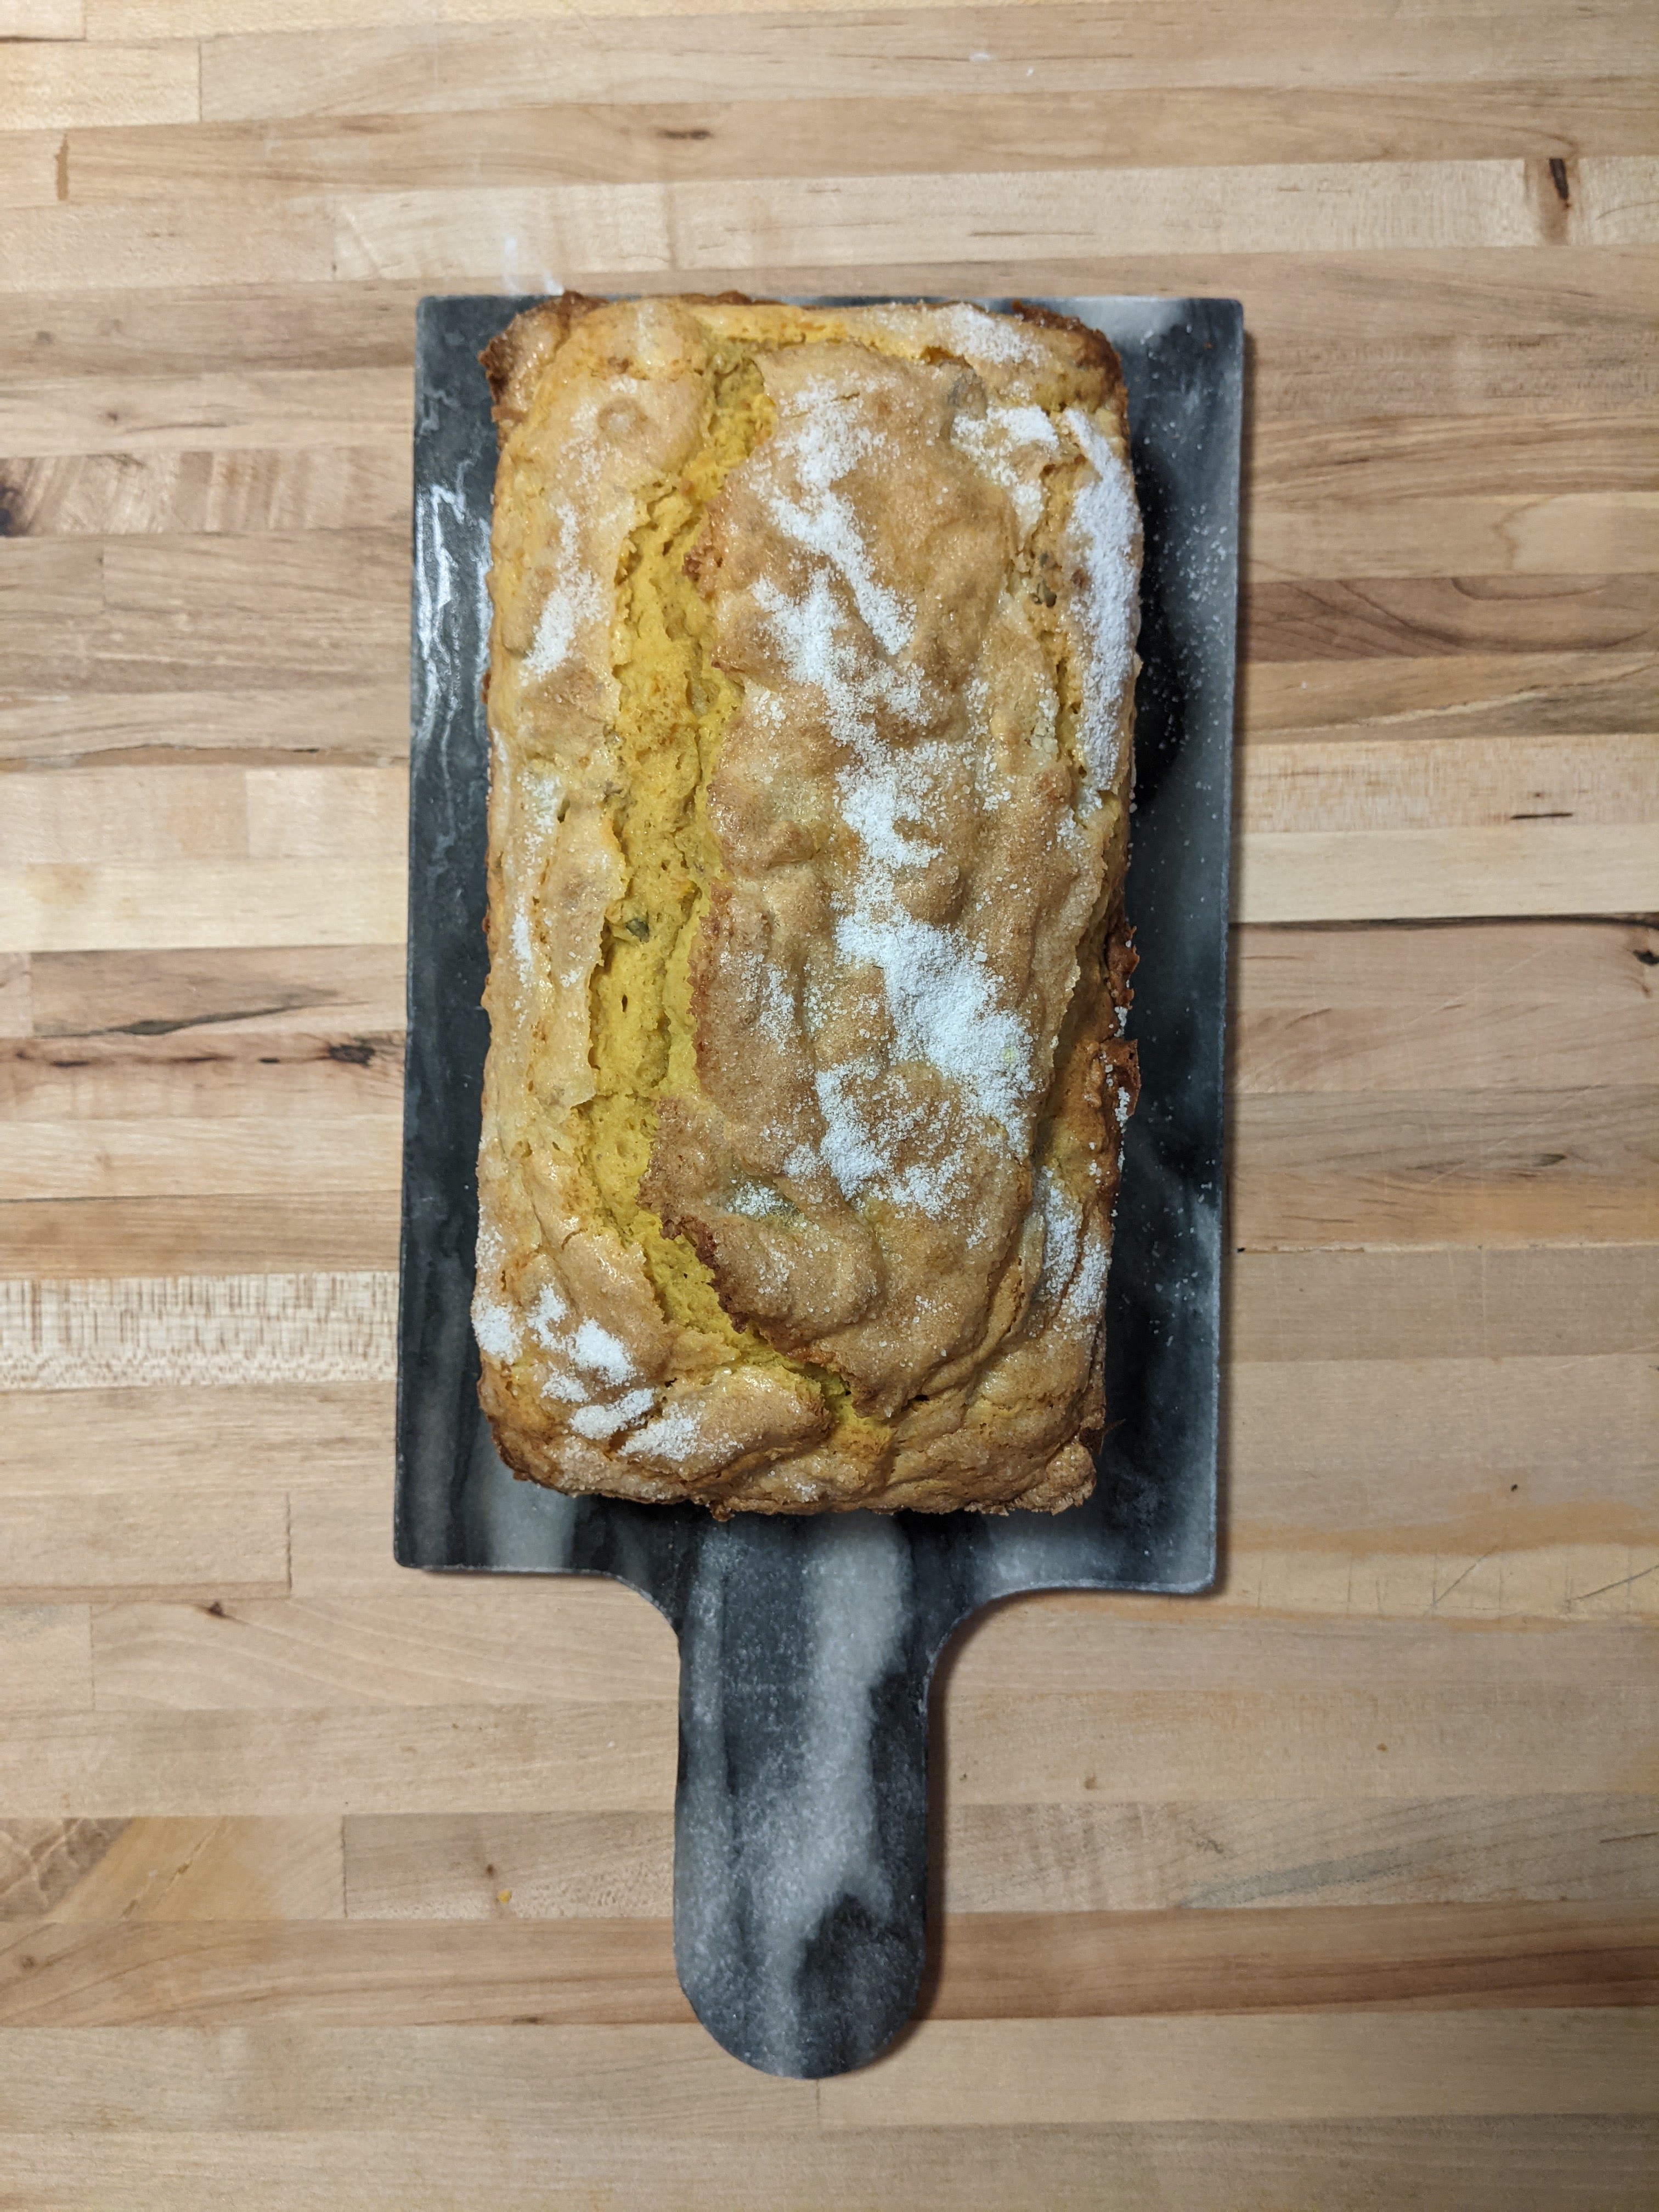
The batter itself came together rather simply, and was like most loaf cakes. Claire makes it so easy to follow along that it all goes by in a breeze! The last step before spooning it into a coconut oiled loaf pan is to fold in the roasted and PEELED pumpkin seeds. Which, since I’m not a seed or nut eater myself, I didn’t realize was something people even did. Who peels pumpkin seeds anyway? So here I sat boiling my pumpkin seeds, slowly peeling the slippery little things, and then re-roasting them! CHAOS! My husband walked into the kitchen to see what I was doing and promptly walked out and went straight to the store to find me some roasted pepitas to correct my stupid? idiotic? hilarious? mistake All of the above.
Once back on track, the recipe went off without a hitch. It baked for the exact amount of time Claire suggests in the cookbook. The house smelled wonderfully savory, and gave me the time to talk with my husband about what might make a good tea pairing to go with this TEA cake. Him being the tea man, I requested a drink pairing. He promptly made me a golden milk latte which is a milk, turmeric, ginger, cinnamon, and honey over a shot of espresso (espresso optional!). Y
This earthy cake was a very interesting take on pumpkin bread that made the rounds to many friends’ porches for tasting. Such a unique flavor combination I had to (safely) share it with all the foodies in my life. Check out the video below to watch me bake through the recipe.
Next recipe for Baking with Confidence is Mascarpone Cake with Red Wine Prunes
Check out my YouTube Channel below!
See you next time for Marscapone Cake with Red Wine Prunes.
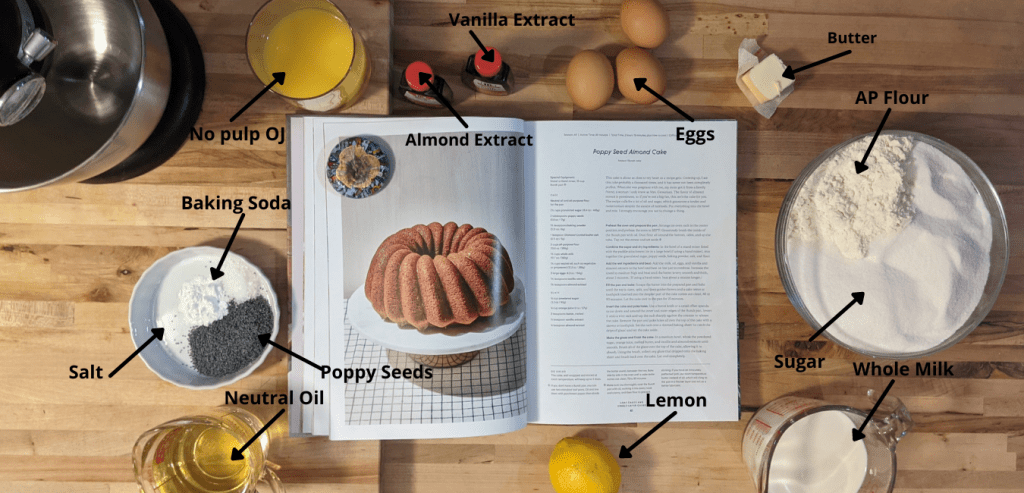
Welcome to Baking with Confidence; a series where I, Natalie, bake my way through Claire Saffitz’s cookbook Dessert Person. If this is a return visit, thanks for sticking it out to recipe three with me. Last recipe was Almond Butter Banana Bread (you can go check out that post here). This week, Claire has us focusing on Poppy Seed Almond Cake. Two things come to mind when I think of poppy seeds. One, I need to both use and eat these more, I always forget how much I love the flavor. Two, the Mythbusters episode about poppy seeds and drug testing. If you don’t know what I’m talking about go check out this Discovery/Science channel classic.
Reading Claire’s sweet message about her loved and cherished memories about this cake made think about all the family recipes that have been passed down and shared in my life. On one side of my family for many years my grandparents would print out custom made recipe sheets for our ever growing family cookbook. It became an annual tradition to add new recipes to the family cookbook when we all got together for Christmas. On the flip side my grandfather passed down what I can assume is his father’s apple press, and my whole life I have spent time each fall hand pressing cider with friends and family. So much of the experience we have with food is tied to our memories. It’s not just about a nostalgic meal, but the reminder of how you felt last time you had it, and memories of those with whom it was shared.
Diving into the recipe, two things caught me up at first glance. First, she didn’t specify what temperature the eggs should be when added to the recipe, or if I needed to combine the wet ingredients together, and then pour them into the dry instead of just combining all at once, then mixing. I think the second was reader error (I didn’t lose my glasses, I swear), because when I read back through the recipe after baking I noticed she does, in fact, clarify that it should all be combined in one bowl. As for the temperature, I deferred to one of Claire’s other YouTube videos where she said that room temperature is always the preferred temperature.
As I prepared all my ingredients I had been flipping back and forth to the Baking Matrix at the front of the book, when I realized that Claire was thinking of us, and put all of that information at the top of the recipe page! I think one of the wonderful things I am going to experience while baking my way through this cookbook is getting to really see and appreciate all the little details pf the book itself. As for the ingredients, the only item that might not be stocked in your pantry is poppy seeds, but those are available in the spices section 0f most grocery stores.
Again and again I have to mention that pre-measuring and prepping all my materials (mise en place for my fancy readers) ahead of time is the most wonderful experience when baking, especially with the oven set to 350F/ 170C and my bundt pan oiled and floured. By the way, I highly recommend if you have never floured a pan before to knock it around over a sink because it can get messy fast! As for the pan, if you don’t have a bundt a cake pan or loaf pan will work as well, but for the measurements in the book you’ll need two cake/loaf pans. Creating the batter was the simplest step of the bake, though I strayed from the recipe a little when I ended up of briefly whisking together the wet ingredients before streaming them into the dry.
Once the cake is baking it’s time to turn my attention to the orange and lemon glaze, since it’ll get poured on top of the cake while still fresh out of the oven. I am neither a big orange nor almond fan, plus there is something so timeless about lemon and poppyseed, so I decided to call an audible on the glaze. I am not trying to stray away from the recipes too often, but to best enjoy this cake myself I omitted the almond extract and doubled the vanilla, and halved the orange juice to add an equal part lemon juice. Not a drastic change, but I appreciate that Claire notes at the bottom of many of her recipes recommended changes one can make to the recipe to account for personal taste.
So while the cake is cooling off in the pan, I have a few minutes to dig out toothpicks to poke holes into the warm cake to help it take in the sweet glaze. Now, I’m going to level with you guys, this cake STUCK to the pan. Super glue, caulk, and the gravitational attraction of a thousand collapsing suns comes to mind. A number of things could have happened here. A: I didn’t flour and grease it enough, B: It was the shape of my pan that was the problem, C: Quarantine life has gotten to me and I desperately need to go back to the gym, but I’m going to go with option D: All of the above. With the cake finally wrestled out and in one piece I should add that the glaze absorbed nicely. All that’s left to do now is wait for it to cool before digging in; a feat all on its own! In addition to the change in glaze I made, I would also add more poppy seeds next time I make this recipe. This one has totally made it on to the make it again list.
Claire’s recipe really made the easiest, most delicate, and absolutely delicious cake! Like many people who bake, we like to share our goodies with others. To make sure to stay COVID safe, I’ve been making more masked-up front porch drop-offs instead of back porch wine and cake nights. It’s still nice to see the smiling faces through the window and get all the loving text messages from satisfied friends. As a little bonus, I’ve already gotten requests to make this again, hopefully for a face-to-face gathering before the end of 2021.
Next recipe for Baking with Confidence is Kabocha (a Japanese squash, not poorly spelled fermented tea) Turmeric Tea Cake.
Check out my and Claire’s videos below!
See you next time to get one step closer to Baking with Confidence!
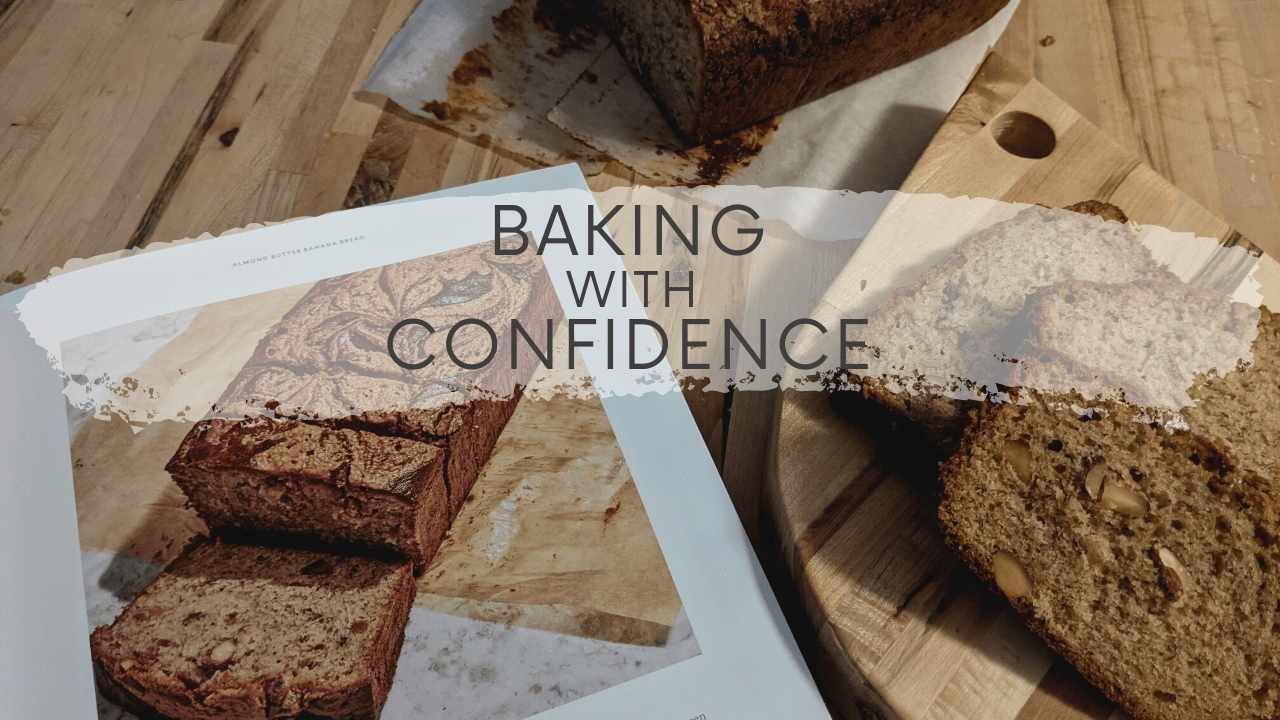
Hello and welcome to my second part is this series of Baking with Confidence. Baking my way through Claire Saffitz’s “Dessert Person”. I will be cooking every recipe in order, slowly making my way through in one year. The second recipe in the book is Almond Butter Banana Bread. Claire made this easy for me with the classic bread but with a new twist. Let’s get into it!
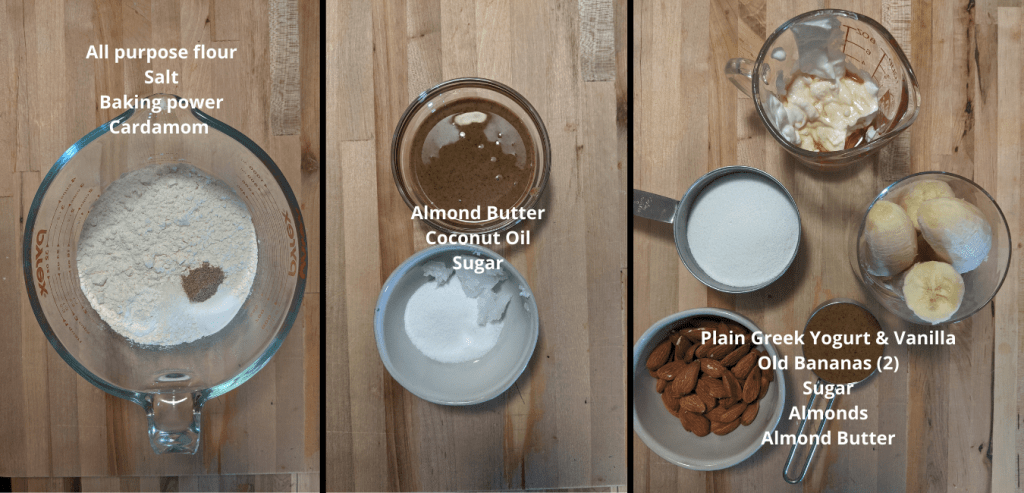
Reviewing the recipe all the ingredients look like a classic banana bread recipe with an almond butter swirl on top. Maybe this is just me, but reading over her ingredients I needed to make a trip to the store! I needed to grab a jar of almond butter, I myself am not a huge peanut/almond butter person. Outside of the random craving for a timeless pb&j and a treat for my pup I don’t gravitate towards it. NOT EVEN a Reese’s cup. In addition to almond butter, I need to dig through my whole spice cabinet for cardamom. I think this spice has been in my cabinet longer than I can remember, I might have even moved with it. The last and final item is greek yogurt, I don’t know about you, but we don’t keep yogurt in the house all the times.
In Claire’s note to us at the top of her recipe, she talks about how such a simple and timeless recipe as a banana bread can go so far awry. Which, I don’t know, if after one recipe I am becoming more of a “Dessert Person” but this bread was easier. For me what hit home while making this, is to all my nut allergy friends, this bread is for you. A moist, savory, and sweet bread that you can indulge in. Maybe next time add chocolate chunks? You tell me.
With all my items measured out, oven ready, pan lined, I am ready to make this happen! In the beginning of the book Claire has laid out in her Recipe Matrix how long everything will take. The Almond Butter Banana Bread should only take a little over a hour and half, did it take me that long? Exactly, an hour and a half! I remembered to keep track of the bake this time. I am learning, I promise.
Hands down guys, prep your items in advance, because it is so easy! The whole baking process is so much nicer and just flows if you do this bit of work in advance. Before, I dive into the bulk of the recipe Claire instructs us to make the almond butter swirl topping before the batter. My almond butter is all nature and very loose, too the point I am concerned for my recipe, but we shall see. I am hoping that the sugar and salt will thicken it up?
As I finished the final preps: measuring out the coconut oil, chopping the unsalted roasted almonds, and mashing the bananas. (Yes, yes I am singing Gwen Stefani’s Hollaback Girl) I grab the COLD eggs and mix into the remaining “wet” ingredients quickly using my mixer. I then added the wet mixture into the dry slowly combining it until the coconut oil and bananas were fully incorporated.
Once the wet and dry has become one batter I needed to fold in the coarsely chopped almonds. Can someone do me a favor and find a picture of what this illusive “coarsely chopped” looks like because I never feel like I quite nail that. I am pretty sure I went back 2 times after the first chop through. When I do this recipe again I think I might add slivered almonds to the top of the bread for added texture. The almonds are fully folded in, it is time to add the almond butter swirl on top! Just as I feared the almond swirl is still very wet and I don’t achieve the beautiful swirls Claire does in the pictures. C’est la vie! I pour the batter into my pre lined pan and pop it into the oven at 350.
After one hour and a margarita later the the bread is ready to cool in the pan for about 20 minutes before moving to the cooling rack. I started bouncing ideas off my husband on who we should give this too, since I don’t like almond butter, coconut oil, or bananas. (The point of this challenge is not to just making things I like, but to learn to be a better baker and accomplish a large challenge.) I swear, he looked at me so fast I think his neck about snapped!
Husband: You know I love banana bread right?
Wife: Yeah?
Husband: And you know how many times you’ve asked me to save bananas for you to make banana bread and you NEVER made it?
Wife (laughing): Yeah?
Husband: So you think the first time in 9 years, our entire relationship, I am going to let you give this to someone else? No.
Well, here you go guys. My attempt at Claire’s Almond Butter Banana Bread. This recipe is super straightforward, a breeze to get through, and going on the list of make again for sure! Check out my video below to watch me bake through the recipe.
Next recipe for Baking with Confidence is Poppy Seed Almond Cake.
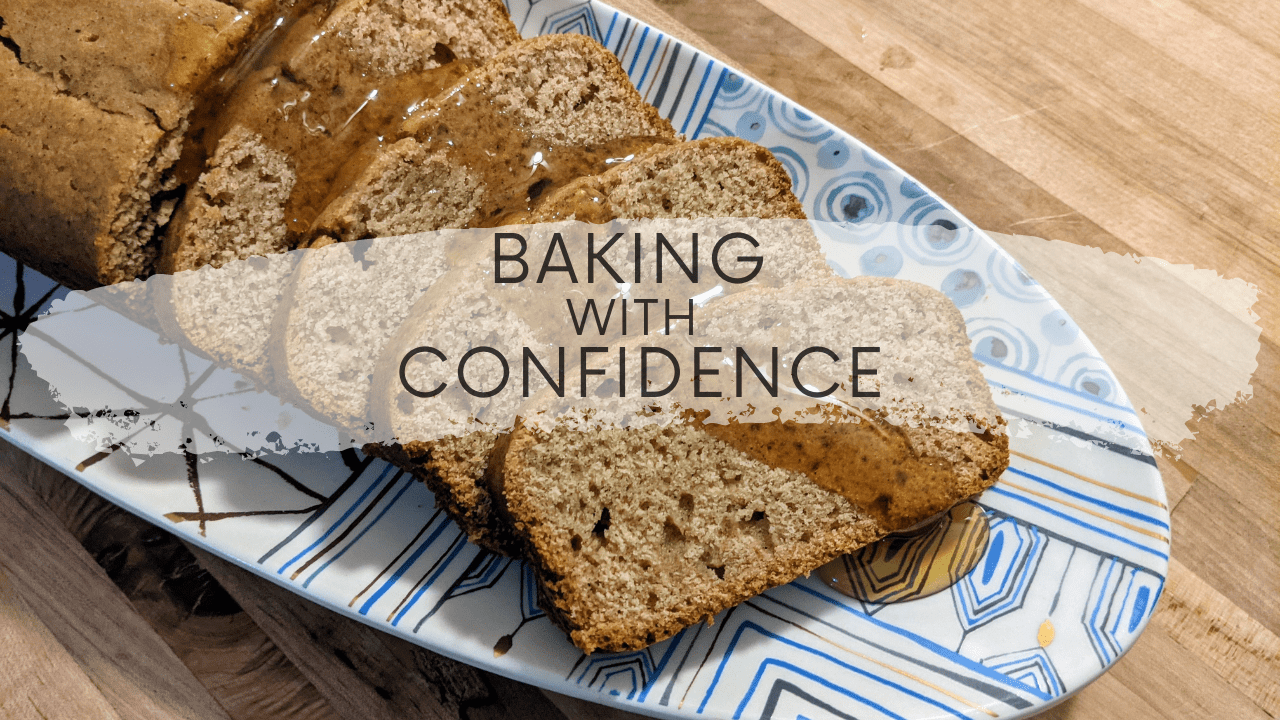
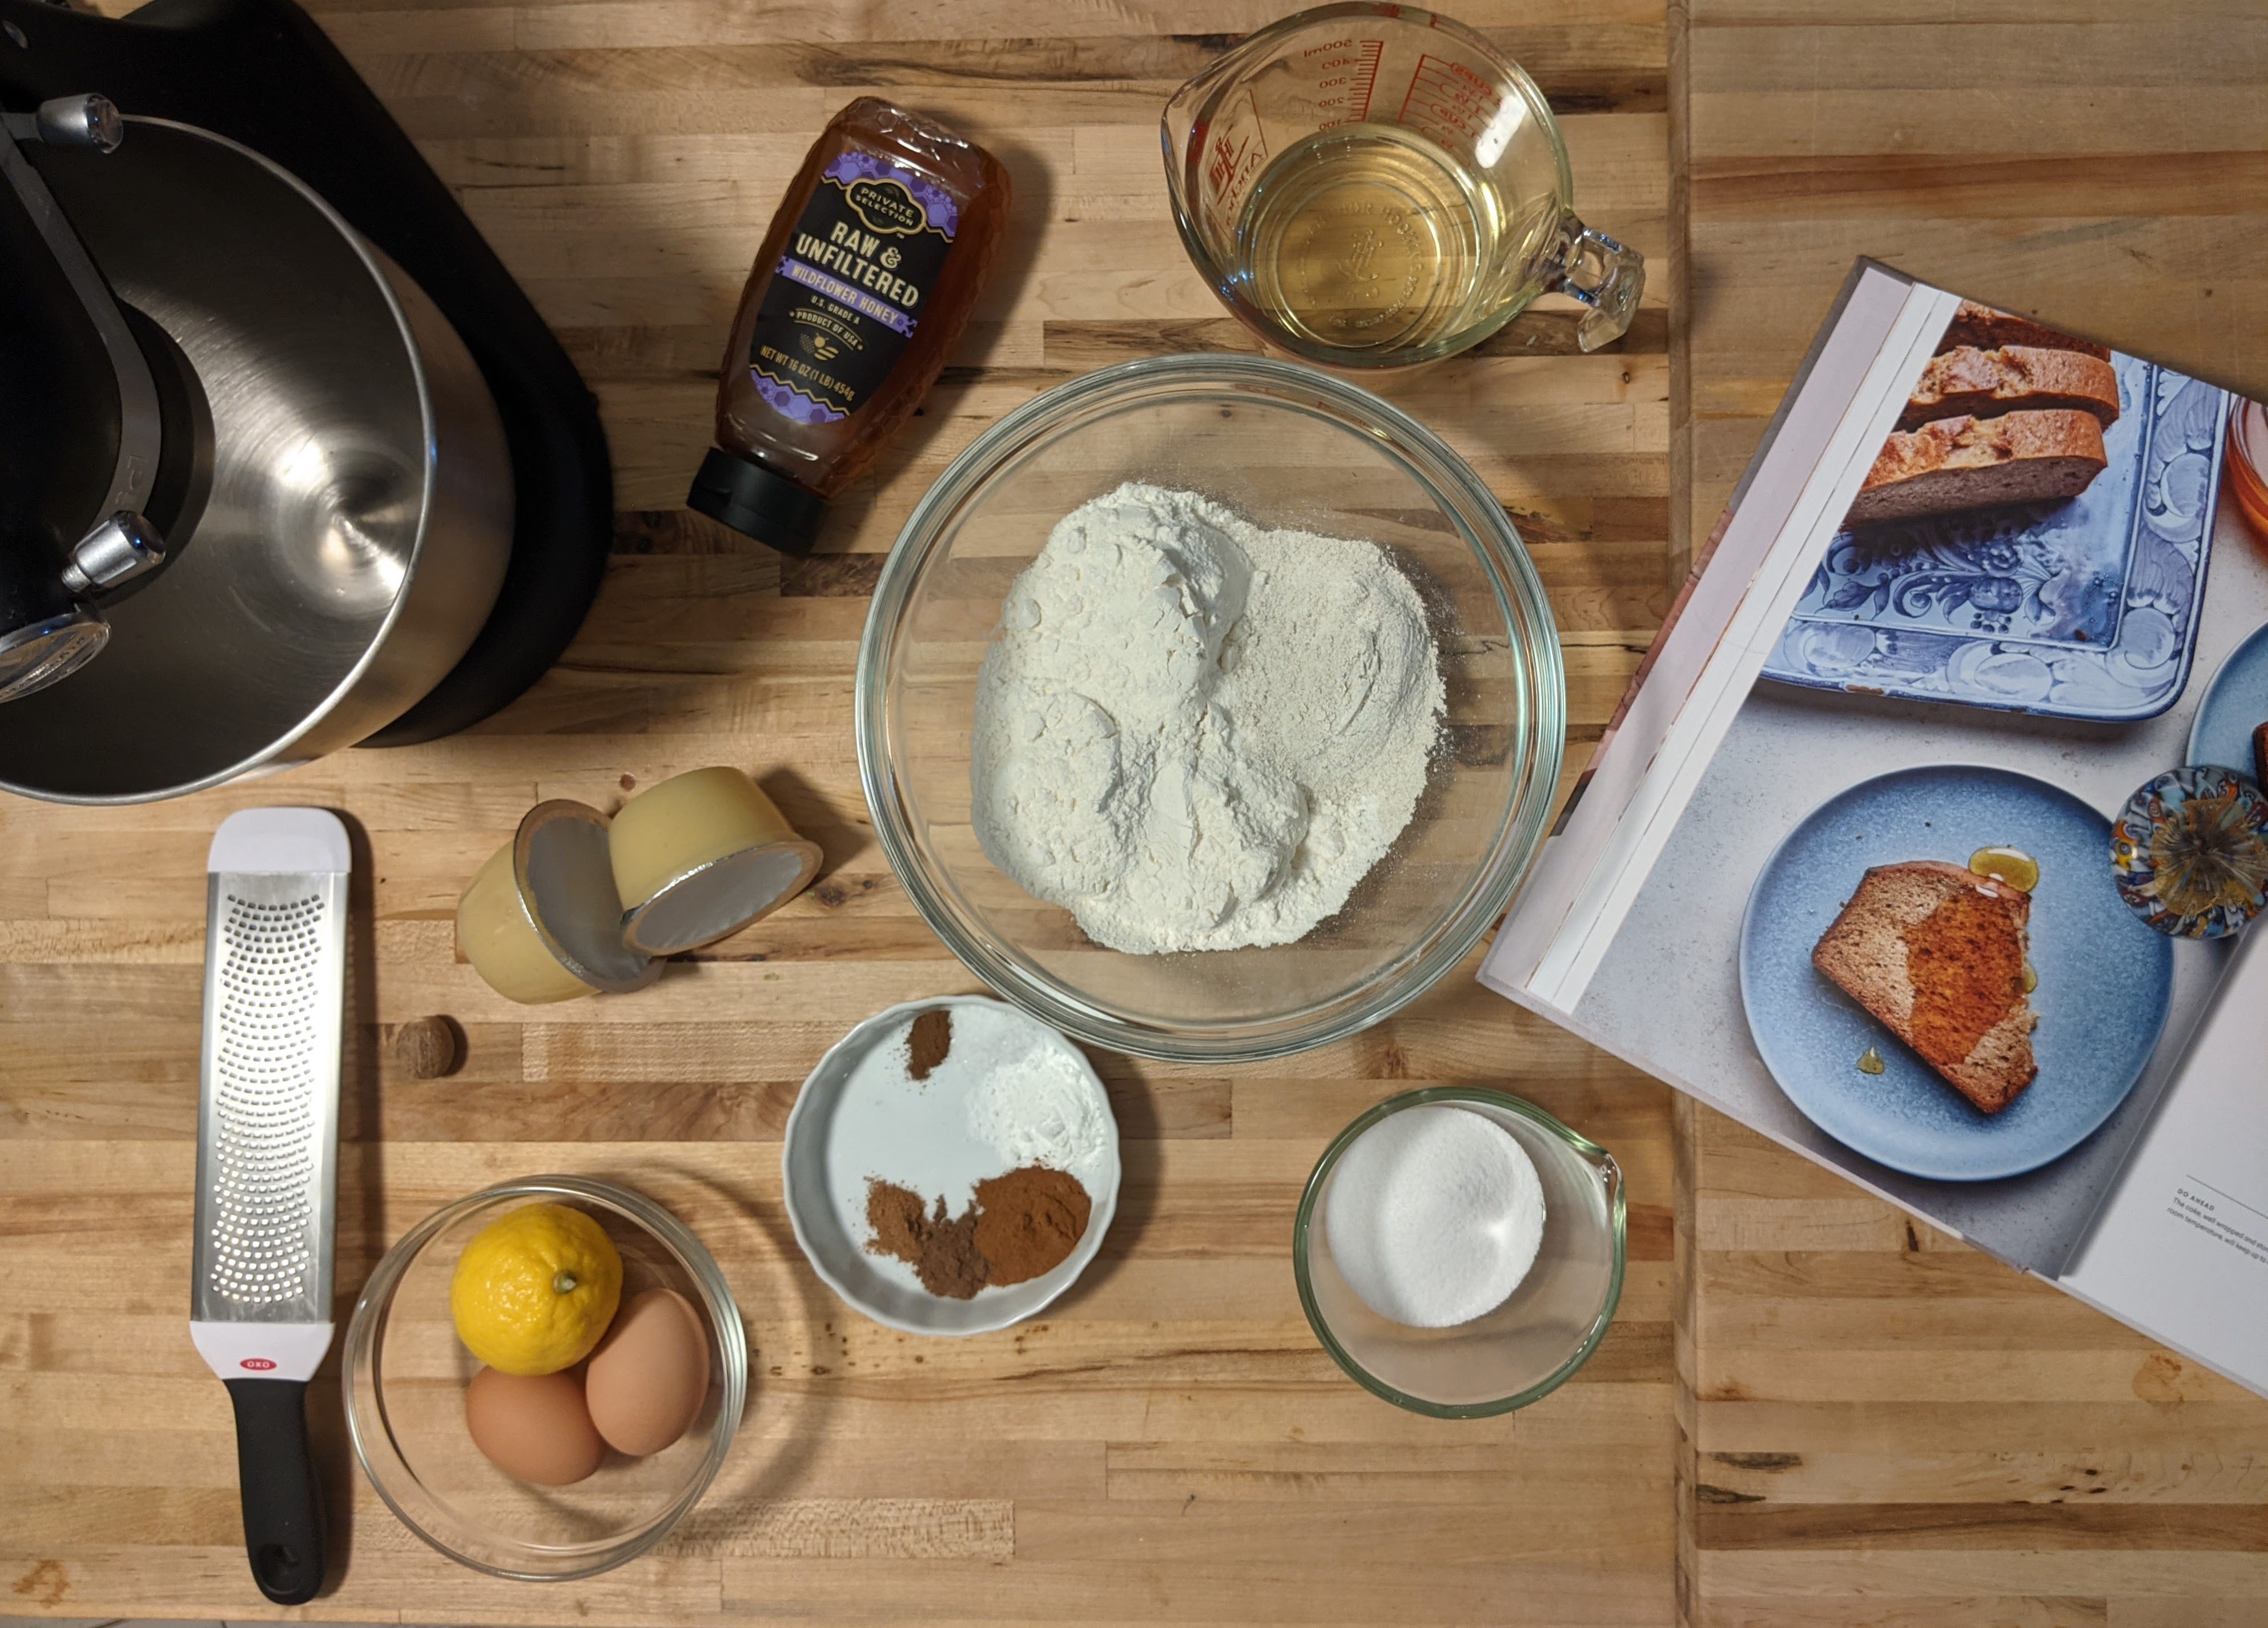
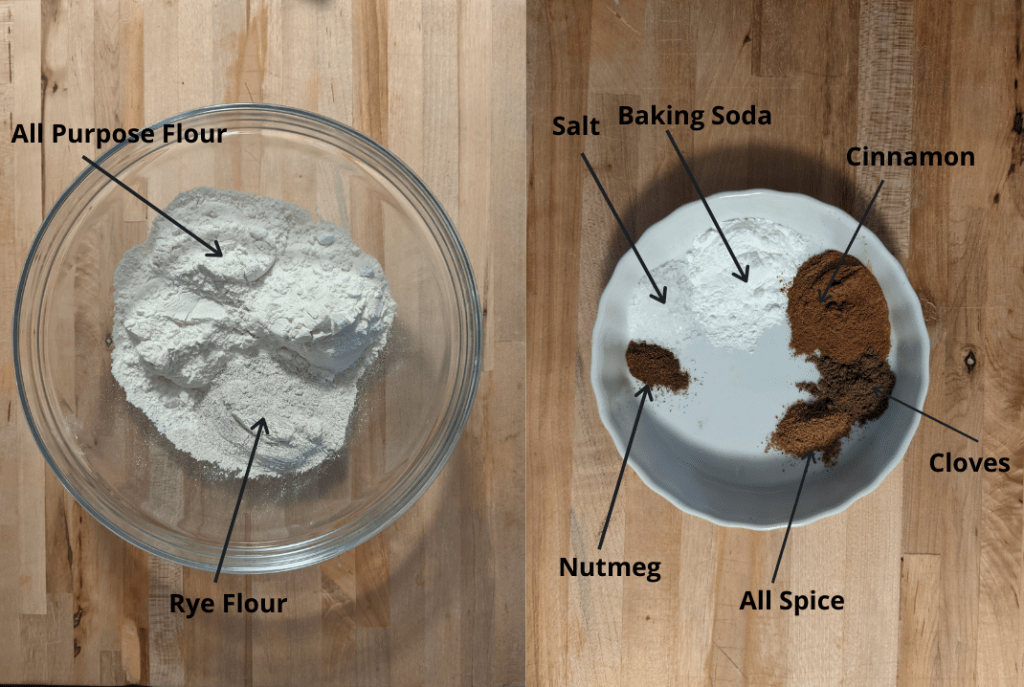
Hello and welcome to my first part is this series of baking my way through Claire Saffitz’s “Dessert Person”. I will be cooking every recipe in order, slowly making my way through in one year. The first recipe in the book is Spice Honey and Rye Cake. Claire made this easy for me with the simple, warm, and absolutely delicious recipe. Let’s get into it!
Looking at the recipe all the ingredients are pretty common household items that you would have on hand at all times. I did go out to purchase rye flour, Diamond salt, all spice, and honey. Why? Even as a baker I don’t do much baking with rye flour, but apparently every other alternative flour according to my cabinet! As for the other items Claire recommends Diamond salt (a coarser grain) over Morton’s salt because of the structure and flavor, so for the sake of the recipe, I went out and got some! Honey, we ALWAYs have it in the house because my husband is a tea and country man and likes him some high quality honey. Let me reenact our conversation:
Wife: Hey honey, I need some honey for my next recipe, can I use yours?
Husband: Sure, how much?
Wife: *Double Checks Recipe* Oh, just a half a cup.
Husband: *looks at appalled* No, you are getting your own honey, you are not wasting my honey on your baking.
Wife: But! Claire says I need the best honey and you have good honey.
Husband: Well if you need the best you can have someone else’s.
We then proceed to go to the store to get honey. I would be curious to try whipped honey. We have a local apiary that makes whipped honey. I would be interested to see how the texture of this honey would change the recipe and flavor. With all the appropriate ingredients it is time to get to work! I set up my Mise-en-Place meaning “everything in place”. I premeasure, brought items up to room temp, lined my pan, and preheated my oven. This is something I don’t usually do but BOY OH does it make a difference. Cooking is effortless! This is a practice that I try to place in my daily cooking, but we all know that midweek struggle.
Claire starts off the recipe with a little note about Rosh Hashanah, the Jewish New Year. Traditionally, Jews partake in apples dipped in honey to symbolize hope for a sweet year ahead. She talks about how every year Jews must endure the dry honey cake, but having cracked the code with the moist and sweet cake. This personal note sent me back to my college days with my Jewish roommate. Every year we’d embrace our different holidays as one, drawing inspiration, and learning about each others traditions. Honestly, some of my favorite memories in college. To this day we still get together time to time to celebrate in our old college ways. I fully intend to deliver this loaf to her next Rosh Hashanah. Even better than that! We can make it together, making sweet memories for another year.
Blending the ingredients is the easiest part, but before you get to that part you have to slowly stream the oil into the wet ingredients. I, for the life of me, always take so long on this step. Be it because I am an inexperienced chef, moving too slow, or maybe just maybe doing it right (I doubt that). From the moment I start pouring the oil in, ten minutes will pass before I am done! Knowing this, I will in the future start a timer for while I am cooking. In the beginning of the book Claire has laid out in her Recipe Matrix how long everything should take. The Spiced Honey and Rye cake should only take an hour and half, did it take me that long? I have no idea.
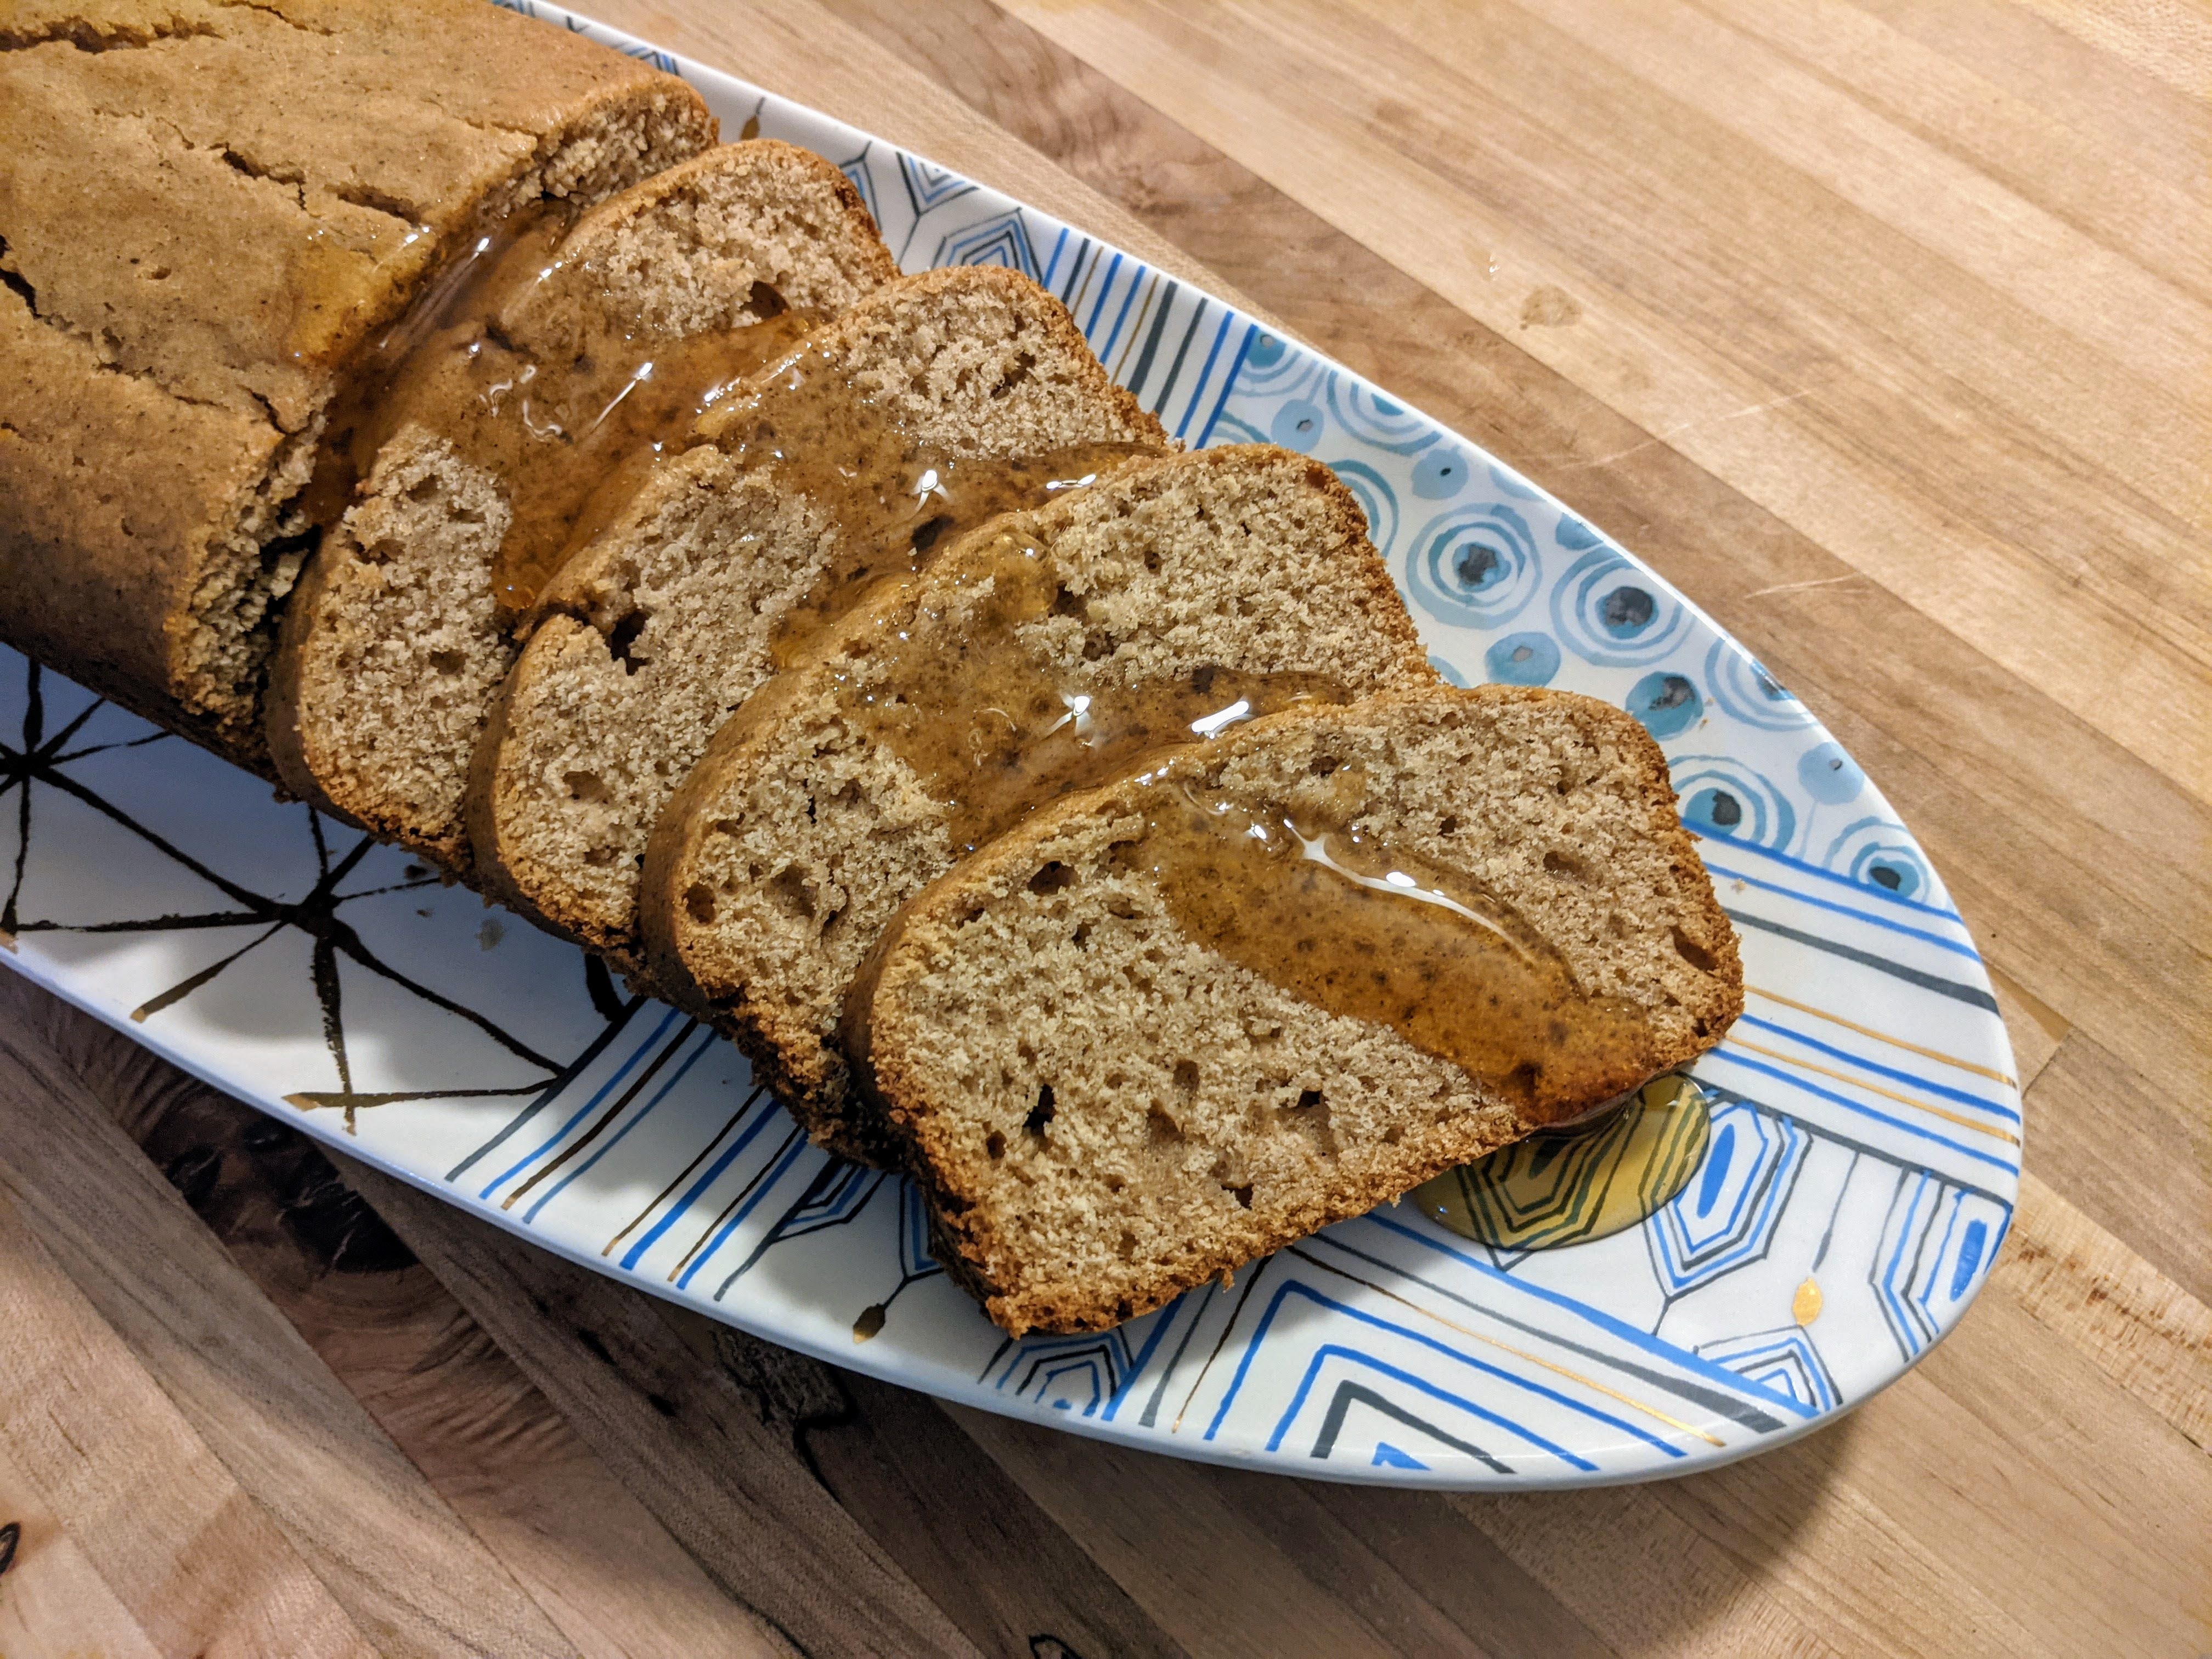
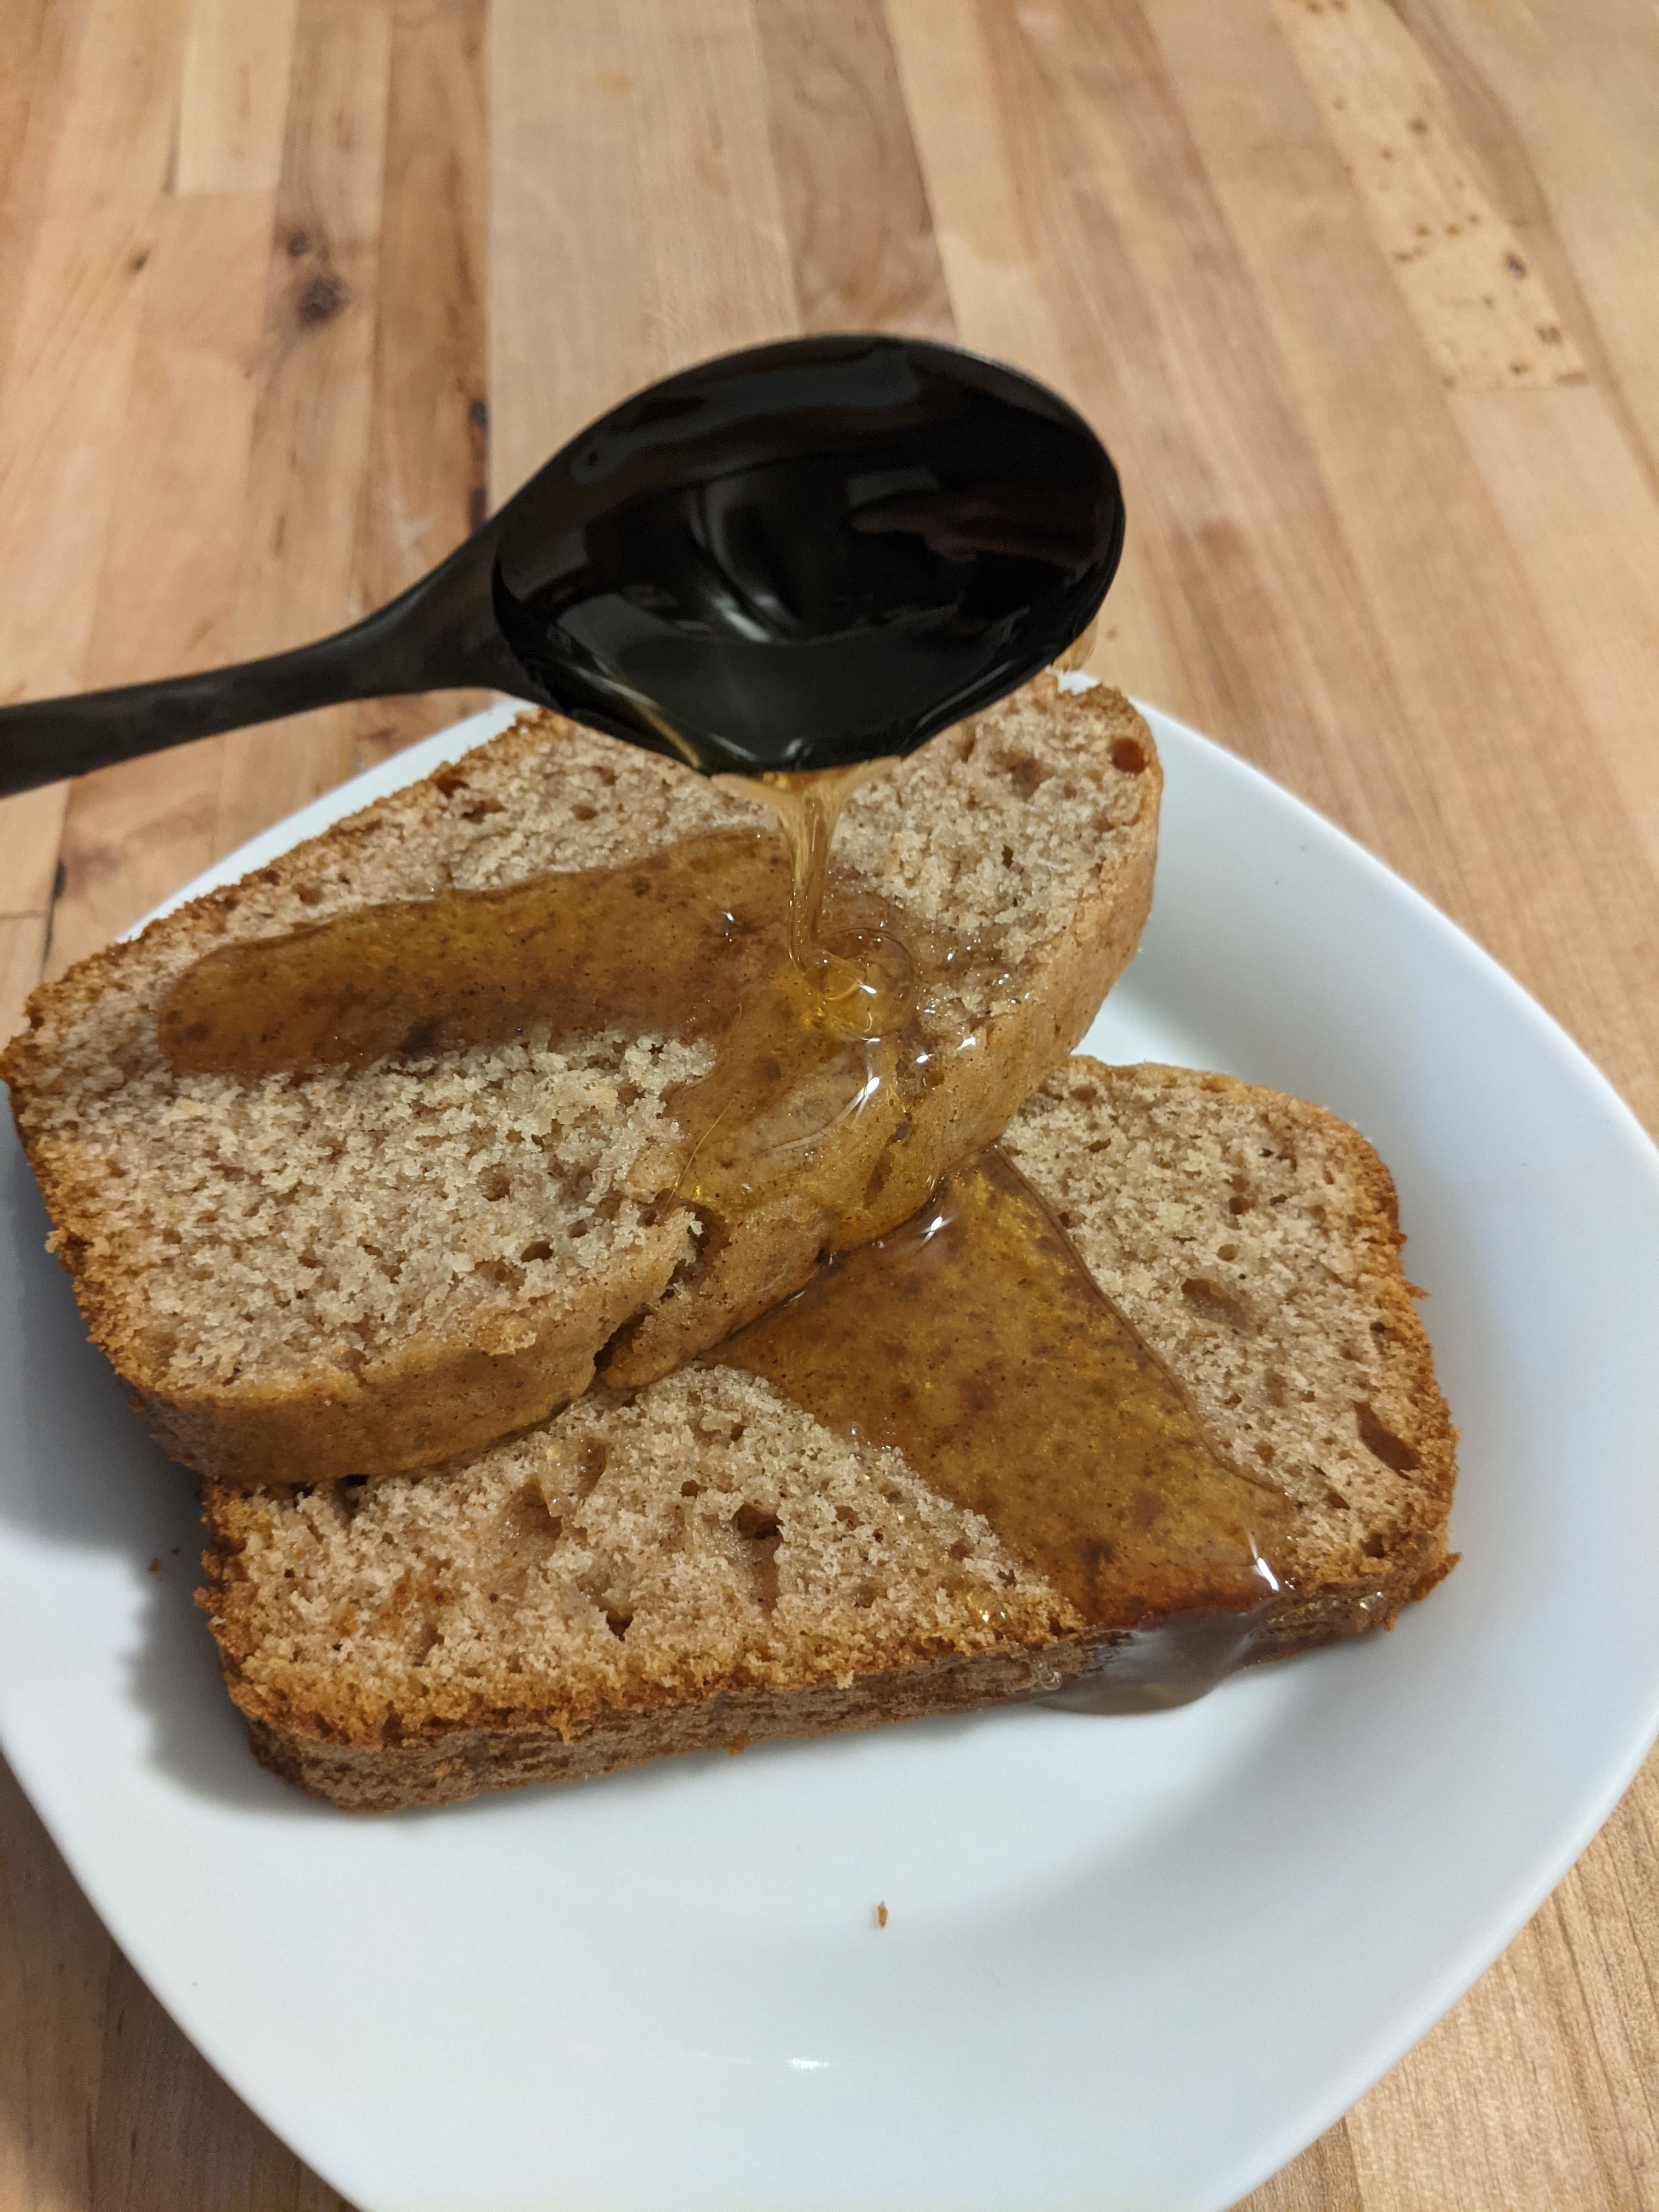
All the ingredients are well combined and it is a dense mixture, typically loaf cake consistency. I pop it into my preheated oven for 50 to 60 minutes which is plenty of time to kick-back and relax with a glass of wine while the sweet smell of spices fill my house. It took my cake exactly 53 minutes. With the cake cooling, my husband started brewing the coffee. He has been hovering since the moment I stepped foot in the kitchen, almost as bad as my puppy. Slicing into the cake and drizzling it with honey make it look so luxurious and ooey gooey good.
My final thoughts before I dig in with coffee in hand is: I think I need fresh baking power my load is a little stout in comparison and Claire I need you to put a book mark in your book next time! This warm spice cake is perfect for any time of day and that’s how I fully intend on spending the rest of mine, eating cake! I believe I am one step closer to becoming a true Dessert Person.
Next recipe for Baking with Confidence is Almond Butter Banana Bread.
Check out my video series to go along with the blog!
As a self proclaimed “Professional” home chef I have challenged myself in the year 2021 to bake everything in Claire Saffitz cookbook Dessert Person. You can also follow her on social media on her Instagram at csaffitz and on Youtube. If you follow me, you know what the post will be about, if this is your first time welcome! Check out my previous post Julie & Julia or Resolutions to learn a little more about why I am suddenly stepping into the kitchen.
As I stated at the end of my Julie and & Julia post I will be challenging myself to cook through Dessert Person in one year. Today is January 3rd, 2021, I have until December 31st to complete at 89 recipes. I have done some quick math and that averages out to be 7 recipes a month. I was originally shooting for 4 a month meaning 1 a week, but I will need to step up my game! Looking over the cookbook and seeing all that it has to offer, there are more gems than you can imagine!
Before you even get into the beautiful desserts and recipes. Claire has thoughtfully laid out a “Recipe Matrix”. On the Y axis it list the difficulty on a scale of 1 to 5. On the X axis it list how many hour it will take you to complete the recipe or component. Starting as low as 5 minutes all the way up to 12 plus hours. Following the chart Claire talks about herself as a baker, her journey to make her own cookbook, and how we the readers will use her recipes.
That being said, hands down my favorite sections are the “How to Use this Book (and Be a Successful Baker)”, “Techniques and End Points”, and “Equipment”. These three sections have so much great information for any level of at home baker. Just to name a few things you can find in these categories: Explaining her difficulty ratings, at home mistakes, how to best prepare yourself to be successful, basic and commonly forgotten tips to make your baking experience easier, and all the ends and outs of the equipment and spices in your kitchen. With this information and breakdown Claire has made sure we are ready to be a Dessert Person.
Looking at the Table of Contents she breaks her recipes into 7 categories. Loaf Cakes and Single Layer Cake, Pies and Tarts, Bars and Cookies, Layer Cakes and Fancy Desserts, Breakfast and Brunch, Breads and Savory Baking, and Foundation Recipes. I plan on working my way in order based on the table on contents. First recipe in the book: Spiced Honey and Rye Cake.
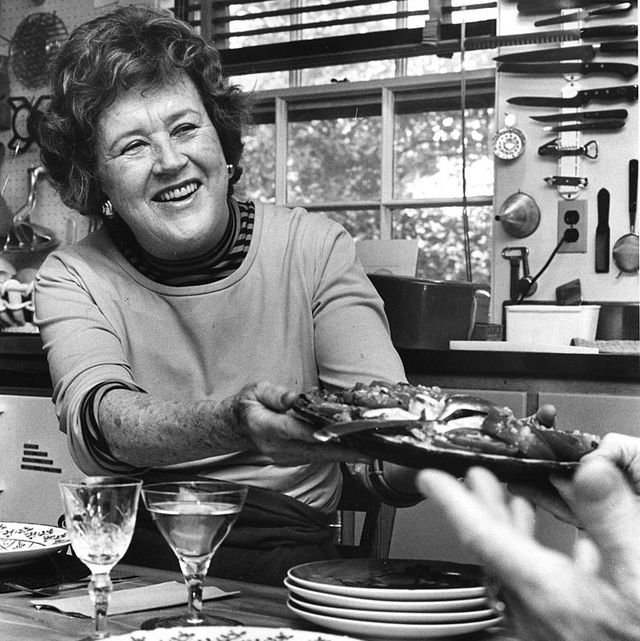
In 2009 a classic movie graced the theaters featuring Amy Adams and Meryl Streep with the first, at least to my knowledge, famous blogger. Now if you still don’t know what I am referencing to. It is the timeless movie Julie & Julia. Quoting IMDB page on the movie “Julia Child’s story of her start in the cooking profession is intertwined with blogger Julie Powell’s 2002 challenge to cook all the recipes in Child’s first book.” If you don’t know of Julia Child, well, she is probably one of the most influential female chefs in the last 50 years.
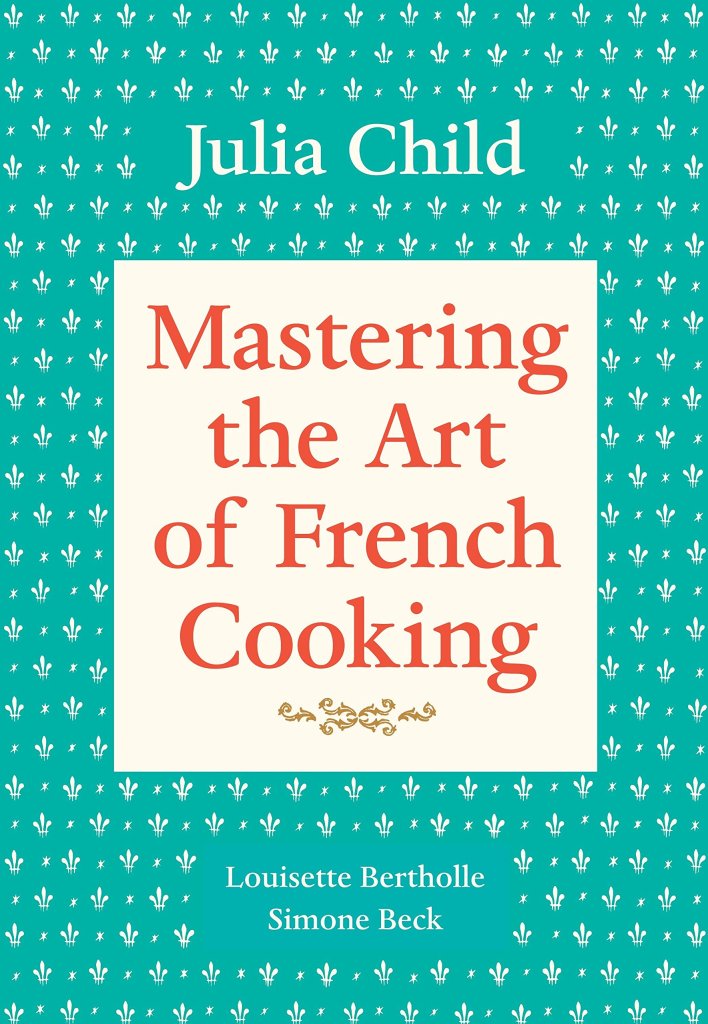
To dive into Julia Child’s life a little more here is a reference to a brief summary of her life and accomplishments in the culinary world. “Julia Child was an American cooking teacher, author, and television personality. She is recognized for bringing French cuisine to the American public with her debut cookbook, Mastering the Art of French Cooking, and her subsequent television programs, the most notable of which was The French Chef, which premiered in 1963.” If you would like to watch the movie is is available on Netflix and Amazon Prime. I highly recommend taking some time to watch this lovable foody classic. Her book is also available on Amazon and in most retail book stores. As someone who personally owns this book, it is one for the shelf.
I am not writing a post just to review this charming movie. I am stating that I will be copying this format. Now before you jump ship, I am not cooking Julia Child’s Mastering the Art of French Cooking. Everytime, I watch this movie it reminds me of two things that I love dearly; cooking and writing. If you have spent any amount of time on my site you will see that my page is dominated by cooking, but in passing I have mention my personal novel writing.
In my last post on the page I talk about resolutions and improving ourselves, achieving goals, working on what will make us happy with ourselves. Since Julie and Julia came out in 2009 I have ALWAYS wanted to cook my way through a cookbook. As a self proclaimed “Professional” at home chef, I think I have the basic skills to properly cook my way through most cookbooks. I think one of the biggest way I can grow for myself would be to be a better chef. As I look at my small but mighty cookbook shelf I see books that have never been opened, but which one to pick?
From Left to right: Joy of Cooking by Irma S. Rombauer, Marion Rombauer Becker, Ethan Becker. Mastering the Art of French Cooking by Julia Child, Simone Beck and Louisette Bertholle. Tartine by Chad Robertson and Elisabeth Prueitt. Dessert Person by Claire Saffitz. Savoring Tuscany by Lori De Mori. All of these have a special place in our kitchen but two have never been used so it is a going to be a tose up between Tartine and Dessert Person. Here are my pros and cons for each; I will be channeling my inner Rory Gilmore for this list. (For all my Gilmore Girl Fans out there.)
Tartine:Pros: New chef to me, new cookbook, wide variety of recipes including savory options. Cons: No real connect to the book or it’s contents.
If you are a fellow at home chef you know that most of the recipes you make have some connection or motivation behind them to be made. It could be a family recipe, something that seems challenging, or a favorite dish you tried on your travels that you want to bring into your own home.
Dessert Person:Pros: Followed the chef for the last two-three years on social media and in magazine. Know a view of the recipes already. Competed in online competitions hosted by this chef. Dessert which is a specialty of mine. Cons: staying in my cooking wheelhouse.
I think it is pretty clear which cookbook I will be going with. I will be cooking my way through Claire Saffitz’s Dessert Person in one year. There are 89 recipes in total, which you might think pales in comparison to Julia Child’s 524 but I am starting small. I will continue to work my full time jobs and pursue other passions outside of the kitchen. So here it is all on the table for your. 1 recipe a week, 4 recipes a month. Yes, yes, I know, there are only 52 weeks in a year so that means I will have to double, if not triple up some weeks. Hopefully, with the vaccine rolling out I might be able to host a party soon and knockout multiple recipes in one go!
If this is something you would like to follow along, I will be starting a new tab on my page dedicated to cooking my way through Dessert Person! Natalie & Claire..not at catchy as Julie & Julia, I promise to come up with something better!
First Recipe: Spiced Honey and Rye Cake!
Bonus Pictures: Top Left: Hot Pocket Competition, Bottom Left: Ferrero Rocher Competition, Middle: Halloween 2019 dressed up as Claire Saffitz, and Right: Poptart Competition.
It is officially a new year. 2021, for many this coming of a new year is the most needed due to the climate of the world around us. Now, I am not stating it one way or another, but it has been a challenging, difficult, and all around a harder year for people. Everyone will interpret this year differently and that is what makes humans beautiful.
Setting aside the stress of the year, I want to focus on New Years Eve, 2021, and resolutions. I have always had an infatuations with New Year Eve and I honestly, I can’t explain to you complete why that is. I plan on trying, but to quote Jane Austen New Year’s Eve “must possess a certain something in her air and manner of walking, the tone of her voice, her address and expressions“. New Year Eve celebrations have been the party of the millennium for centuries. Each empire after the next has had their own traditions, foods, and displays of ringing in the New Year.
In the USA, we traditionally watch the Time Square countdown and celebrate with confetti, kisses, fireworks, and champagne. The following day, New Year’s Day, the south, where I grew up. has a few traditions. Cornbread: for gold, Collard Greens: good fortune, Pork: prosperity, and probably the most iconic southern dish on New Year’s Day is the infamous; Black Eyed Peas: wealth. As someone who has never really felt connect to the “south” I have never participated in any of these traditions. My relationship with the location of life has never felt rooted in the traditions of the area.
All to say what does this have anything to do with resolutions? As someone who doesn’t follow any sort of traditions around New Year’s Eve to put it mildly it is my favorite holiday. Over Halloween, Thanksgiving, and the ever famous Christmas. None of these hold a candle New Year’s Eve in my heart. There is something so magical about those precious hours leading, transitioning, and becoming a new year. It’s the closest to time travel we can ever get to. We are moving forward to a completely different timeline, a new reality, a new world at our fingertips. Now, this must sound like some fantasy I have made in my mind, but let’s really think about this.
We as a collective society are always trying to better ourselves, accomplish tasks, achieve goals, improve upon what we already have, change what we need. I am not saying that the world as whole is completely wiped clean at the change of every year, if it was that would pose some very interesting conversation. Yet, in the world we live in currently, the problem with all of these attempts is we never make actual time to make the change. We never stop, focus, and truly set ourselves up for success. As a goal oriented person; I have had life long goals most of my life and the earliest memory is twelve.
To me this is not a time to harp on myself for not accomplishing the goals I had laid down for myself for the past year, but see how much closer I have come to my life long goals. This time of year I refocus my energy, my drive, revise my plans, the best way to execute these into reality. Give myself time to reflect on what I want from my life and how I am going to use this year to achieve that. I know all I am saying sees dream like, but you need to choose what you want your reality to look like. How you want to improve, change, and grow for yourself and how it fits into this crazy world we all live in. This might look like a variety of things, self growth and strength, bring awareness to an important cause, trying some new, learning a skill or talent that has always interested. Whatever you want focus your mind and passion towards making your path.
As for myself my resolutions are pretty consistent year to year because my goals- resolutions are big. Like many this time of year we all say to be healthier, which yes is one of my goals, but not as a number of weight or days in a gym. Just make it more present in my thoughts and actions. I live like a normal American, but I want to be the 70 year grandmother who still swims in the ocean and goes on simple mountain strolls. For the future life I want to live I must continue to work on the life I have now.
The goal- resolution that drives me day to day or week to week. It is only one. It is the oldest one on my list (right next to backpack the Great Wall of China) is to publish a book. I have written a novel, the first in a series. It has taken me years to build the world, write the story, revise it to be the best version it can be, and now add the final edits and packet details for submission. These final steps have been and continue to be the hardest part. Covid- 19 for sure put a set back in my progress, taking away a lot of my creative drive, but I am desperately refocusing my efforts, because I want this. This will happen, I will achieve my resolution, I will publish my book.
With all my drive, passion, and effort I know is reality these things take time, but all I can ask of myself it to move this process forward as far as my mind, body, and soul can take it. Resolutions, goals, bucket lists, whatever you want to call them, you dictate how you wish to achieve them. Don’t view this time of year as failure, but a time of new beginnings and restarts. Set your own pace and see what happens in the new year.
Hey everyone! My name is Natalie and I am in my kitchen and today we are making Gourmet Pop Tarts. That is direct reference to how the popular show :Gourmet Makes on YouTube by the magazine Bon Appetit. The host of the show is chef, Claire Saffitz. Her show is about taking iconic or fan favorite treats and making them gourmet. Who hasn’t eaten a Pop Tart? My personal favorite was the Brown Sugar Cinnamon or the Smores Pop Tart.
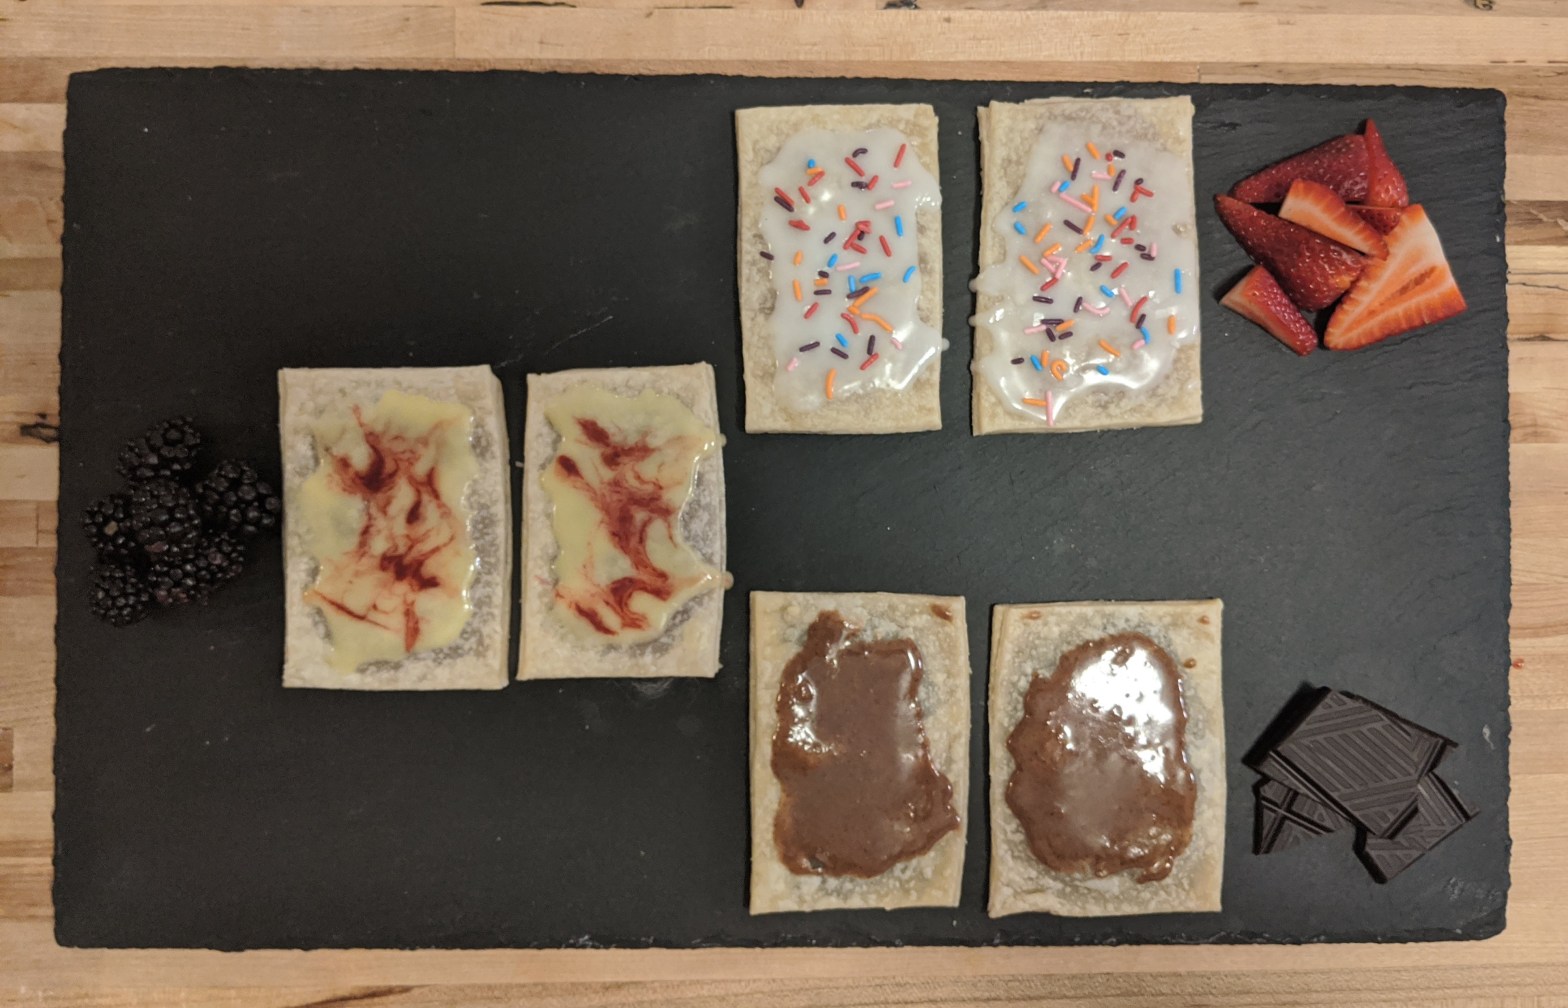
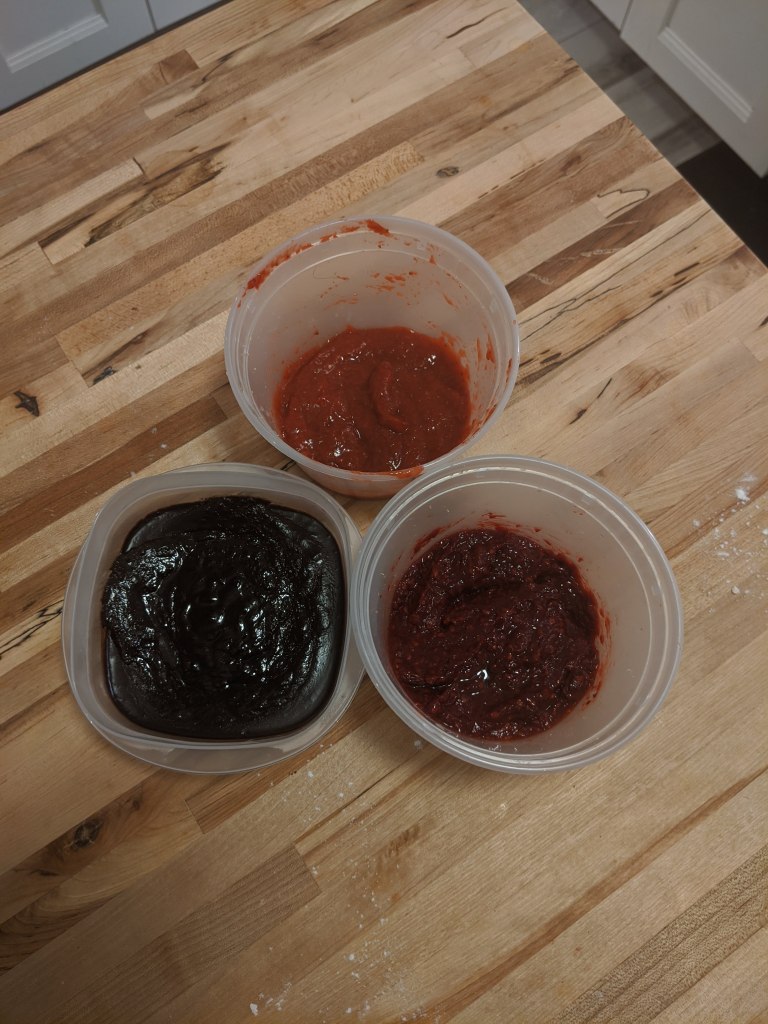
The whole reason I even attempted to make these Pop Tarts is became Bon Appetit is challenging fans of the show to use the recipe, but also make it their own. Film it and submit your thoughts and recreations! So naturally, a HUGE fan and a lover of baking, this was the perfect distraction during quarantine. The recipe is to make nine strawberry Pop Tarts. So, naturally I made 3 strawberry, 3 blackberry lemon, and 3 chocolate cinnamon. Here is the link to the Bon Appetit recipe if you would like to make it yourself, I highly recommend it! https://www.bonappetit.com/story/claire-saffitz-gourmet-pop-tarts
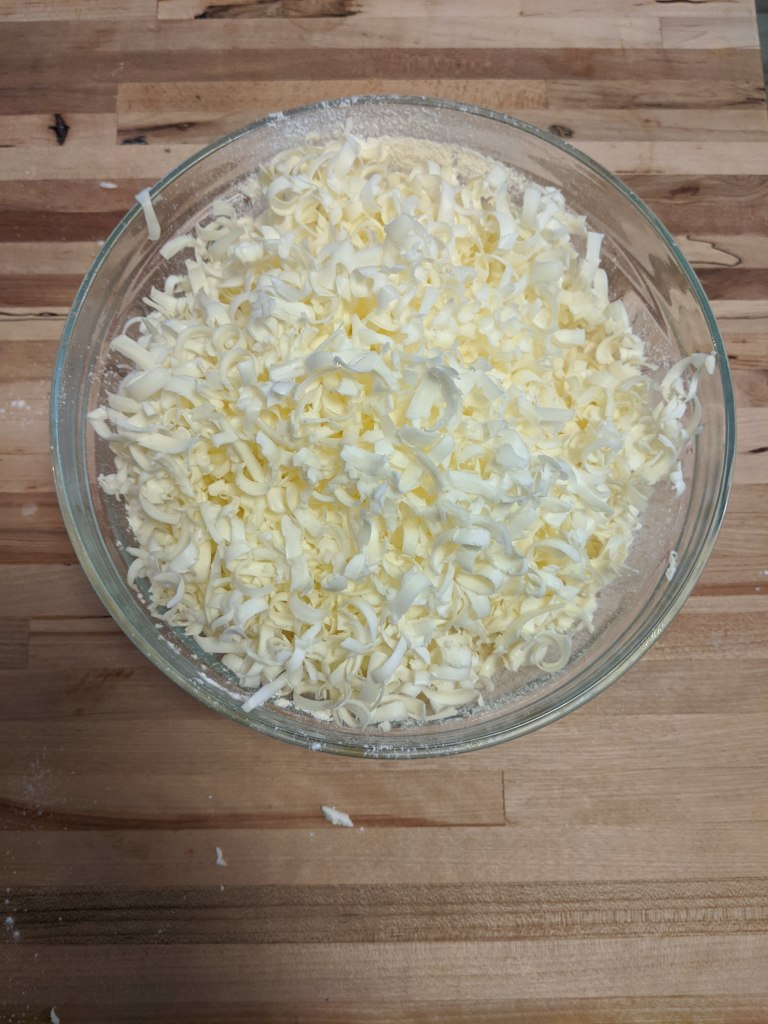
It started like many other dishes that I have made recently with lots of COLD butter! I have to say after completing this recipes and a few others as of late, I SUCK at making dough into squares like can’t we all just agree that ovals work just as well? Anyways I made the dough by first mixing my dry ingredients and than quickly grating cold butter into the bowl. Before I grate the butter in, I kid you not, I had to toss the butter in the flour first. Guy, I’ve made a lot of things, but Bon Appetit is pushing me into uncharted waters. It makes a dough very similar to a quality pie crust.
Seeing all that butter grated into a nice heaping pile was very nice to look at! Tip: in the directions it says the dough will come together with kneading and water, but watch the video. I was struggling to get my dough to come together and I watch Claire get it to come together in a food processor and boy did that work! If you don’t have a food processor, small batches in a blender works too. With my dough chilling the fridge for awhile I need to make my fillings because they need to be cool before going into the dough.
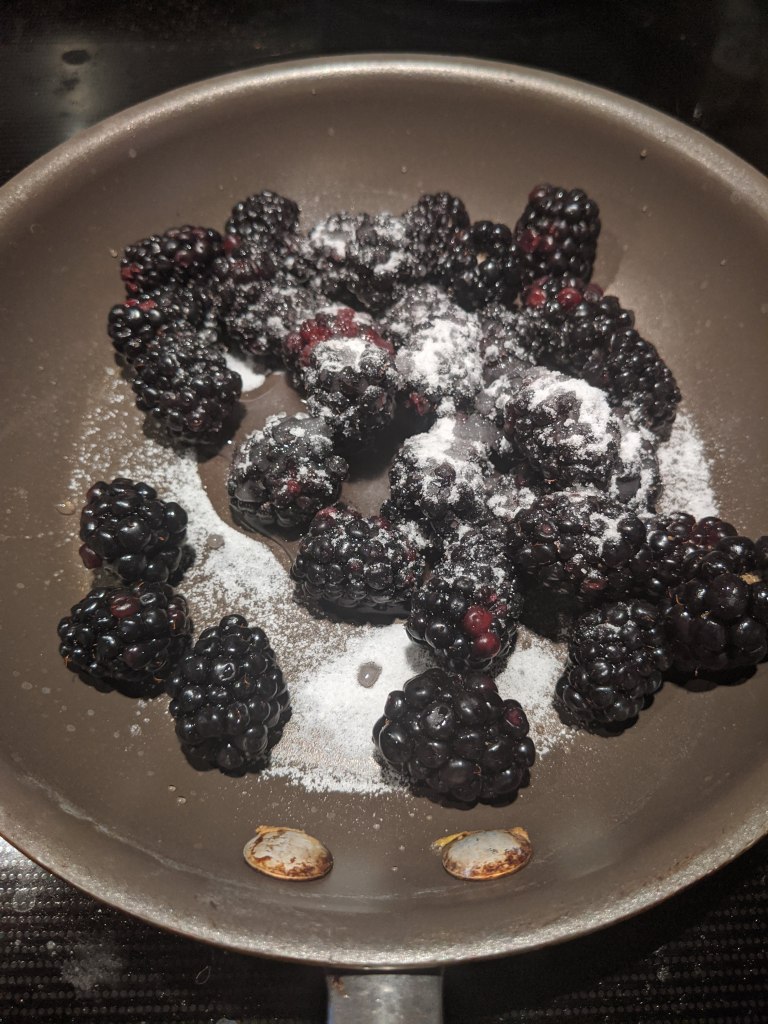
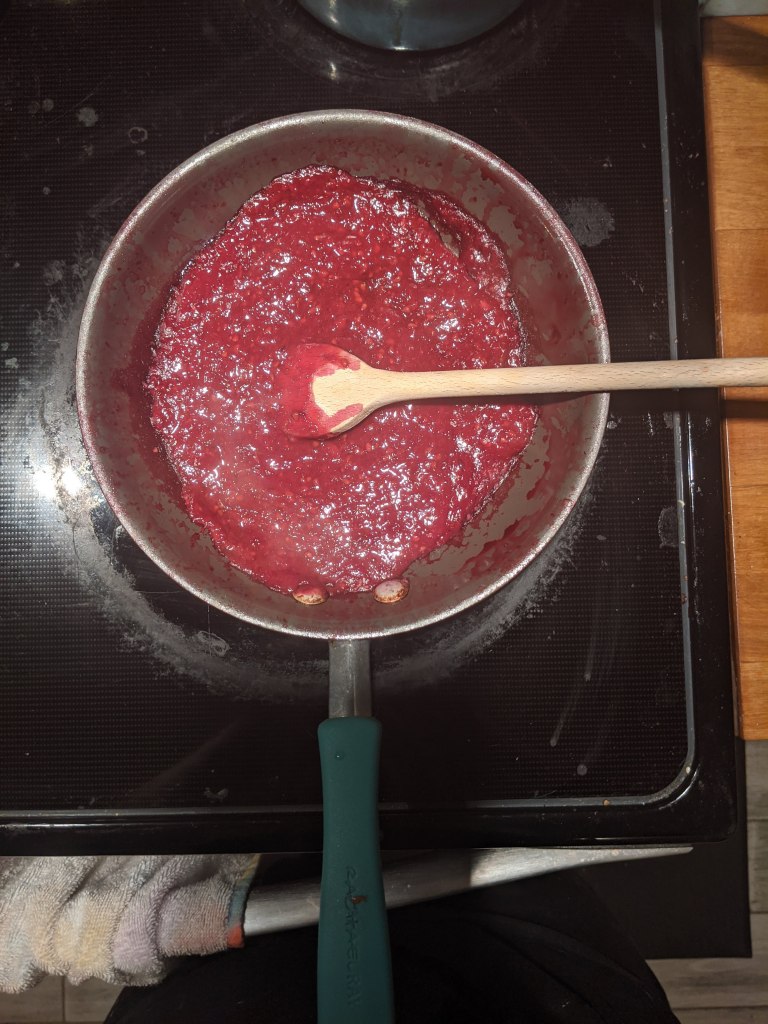
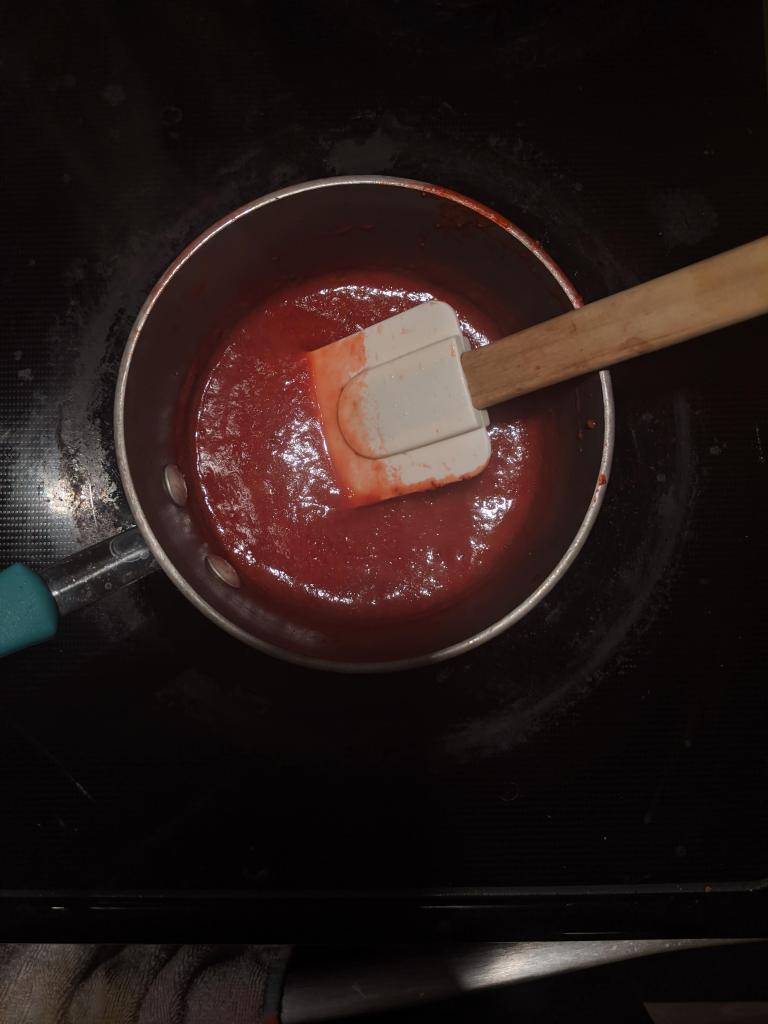
To make any fruit filling it is pretty easy, just like making a jam. If you think making jam is hard, just read the recipe. I promise you going forward you will not fear making a quick jam to impress your friends at your brunch! Literally, equal parts fruit to sugar, cook on medium heat until fruit starts to breakdown and bubble. Continue to cook until you have reached the texture you like. Now for the purpose of this recipe I needed the filling to be very thick so per the recipe I continued to cook it in the oven. I’ll tell you guys this was the weirdest thing I have ever done! Spreading out hot jam onto a silicon matt to cook in the oven.
With the fillings cooking away in the oven I moved onto my personal favorite the chocolate filling! I am a chocoholic! Now to be clear dark chocolate only, none of this milk and white chocolate people. I started with the idea of making a really thick chocolate guanche, sounds fancy, but super easy to make! Again, easy recipe to impress; great to dip fruit in, dip cookies, or over ice cream! Chocolate chips and heavy cream; it is a 1:1 ratio. Heat up the cream until it starts to develop a skin, pour chocolate in and stir until thickened.
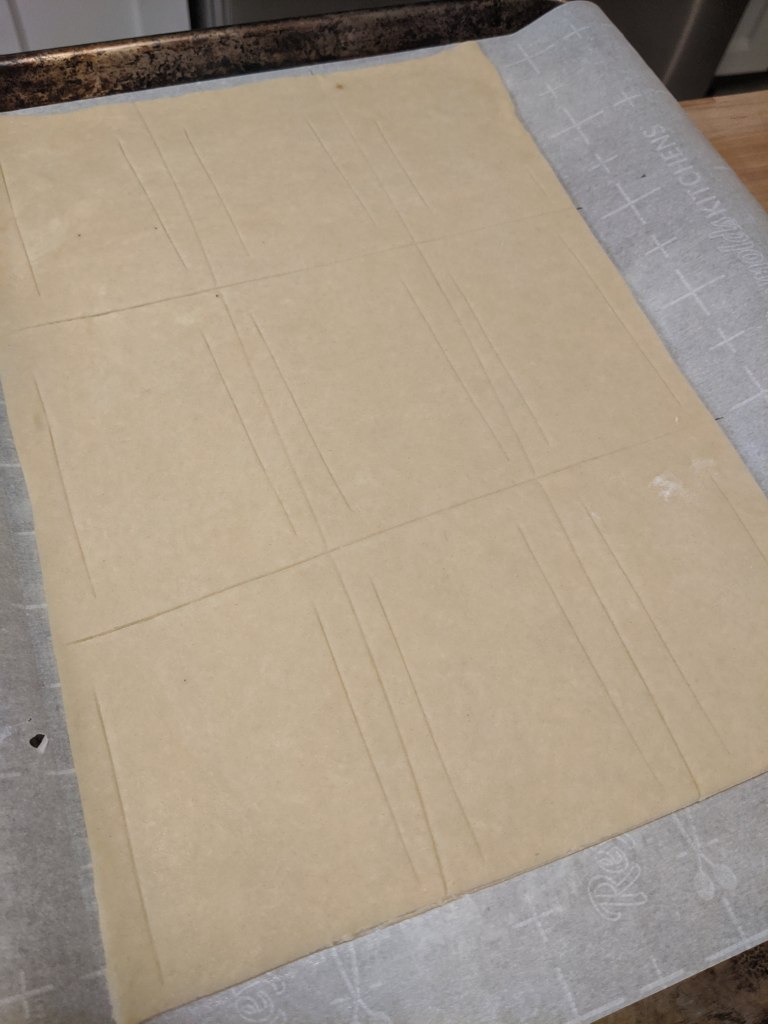
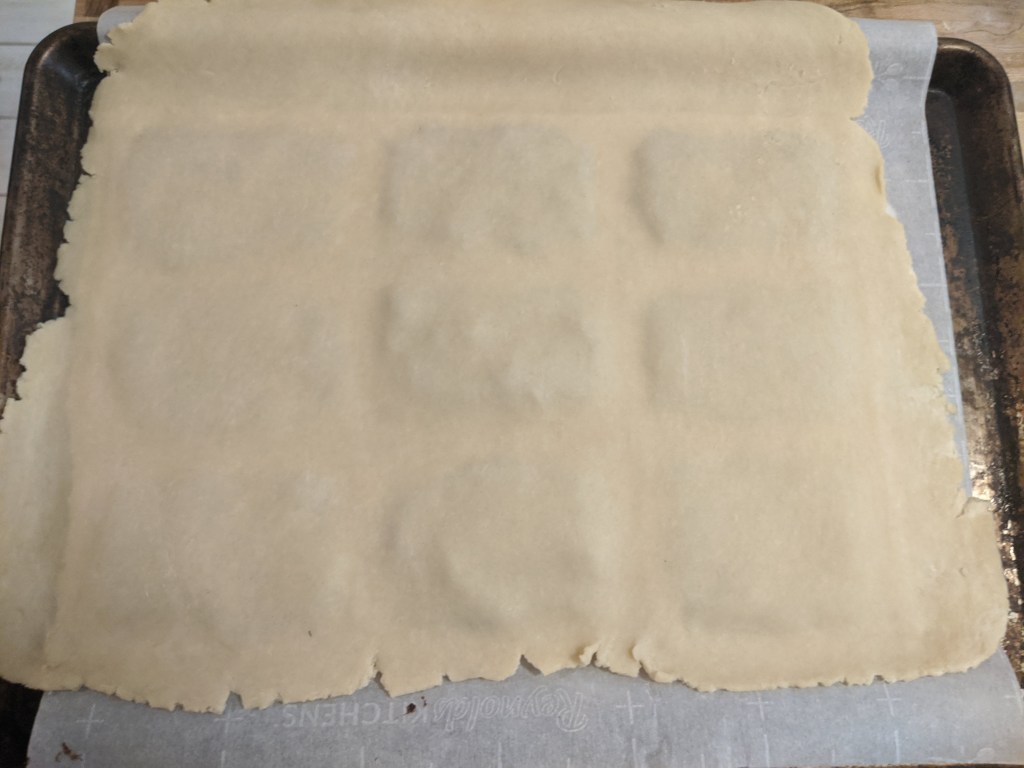
This recipe takes a lot of wait time to make sure all the parts are cool and ready to be made. I preheat my oven like instructed to 300, but in the future I will crank it up about 20 degrees or so. Laugh as you may, but I don’t have a ruler or such and when a recipe says 14 by 10 inches I need to measure it out. I wanted these to be perfect! I fit had to cut the dough in half to make the bottom sheet. I rolled the dough out to be 14 by 10 and then scored out the areas I would be placing filling,
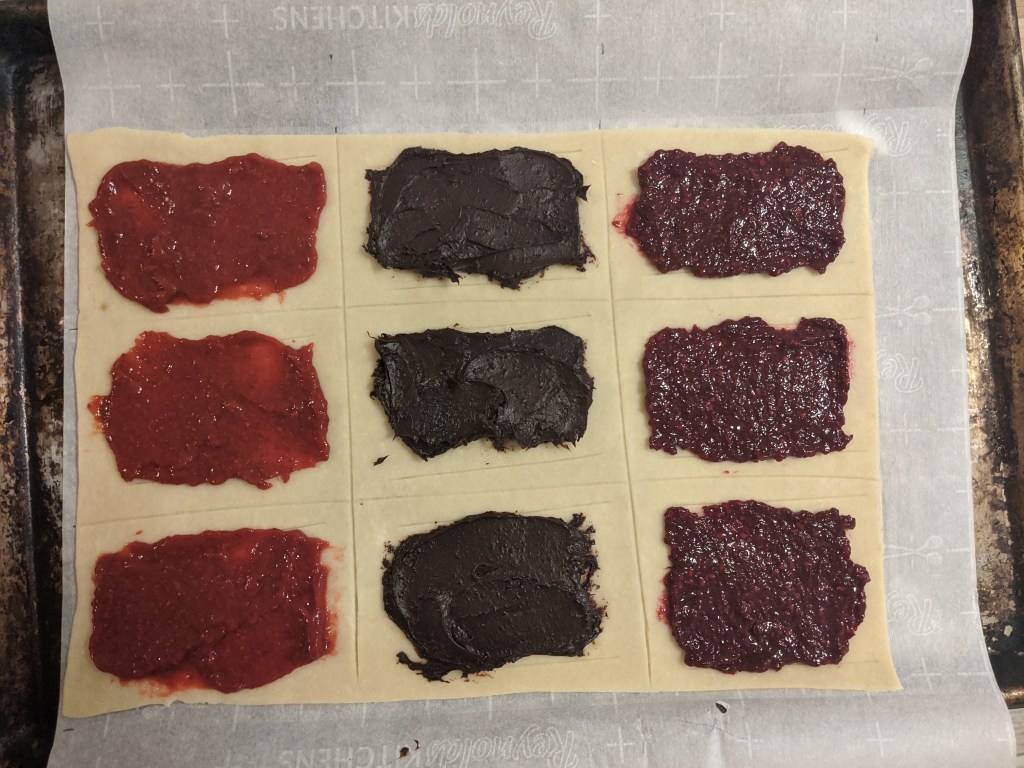
Once everything looked right, I took my fillings out of the fridge to start filling the insides of my pop tarts! I was going to end up with three of each flavor. I used a angled spatula to fill in the pop tarts to achieve a nice even layer.
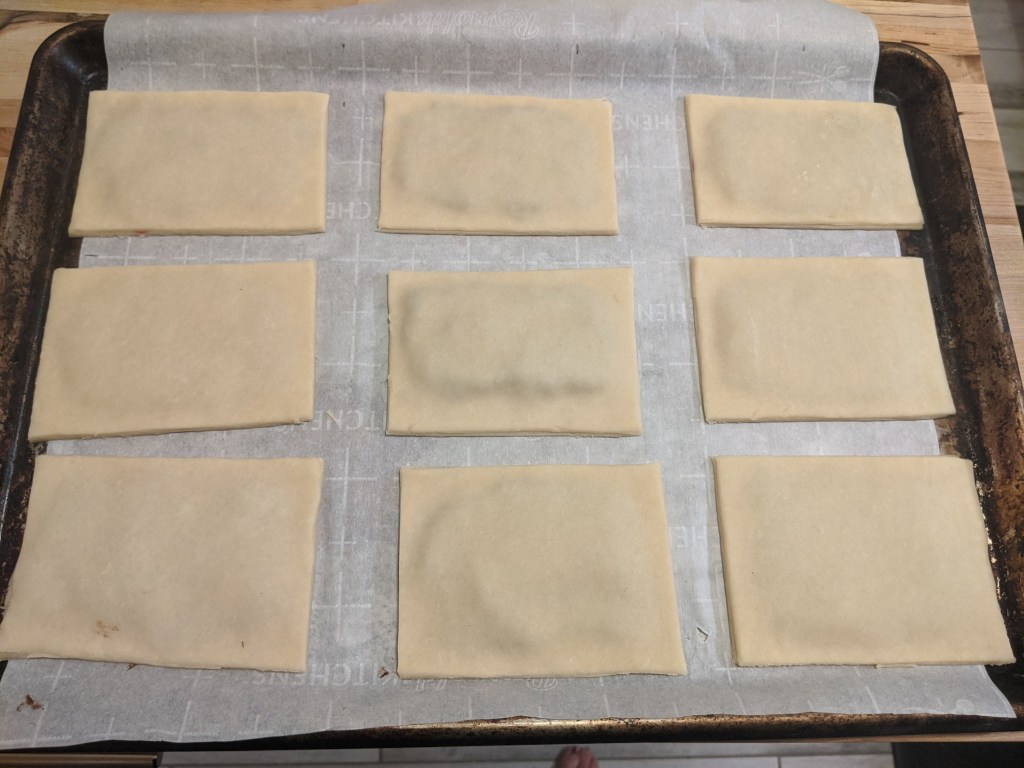
With the filling in, I placed that in the fridge while I rolled out the other half of the dough to over my pop tarts. I missed a step where I didn’t use egg whites to help seal my two pastry sheets together and man would that have helped! So please use egg whites to wash around the fillings before placing you dough on top. Once the second sheet in laid out, carefully smooth out the dough around the filling to reduce any air pockets. As well as light press the sheets together where there is egg wash. When the pop tarts look good take a knife or dough cutter and cut the pop tarts out.
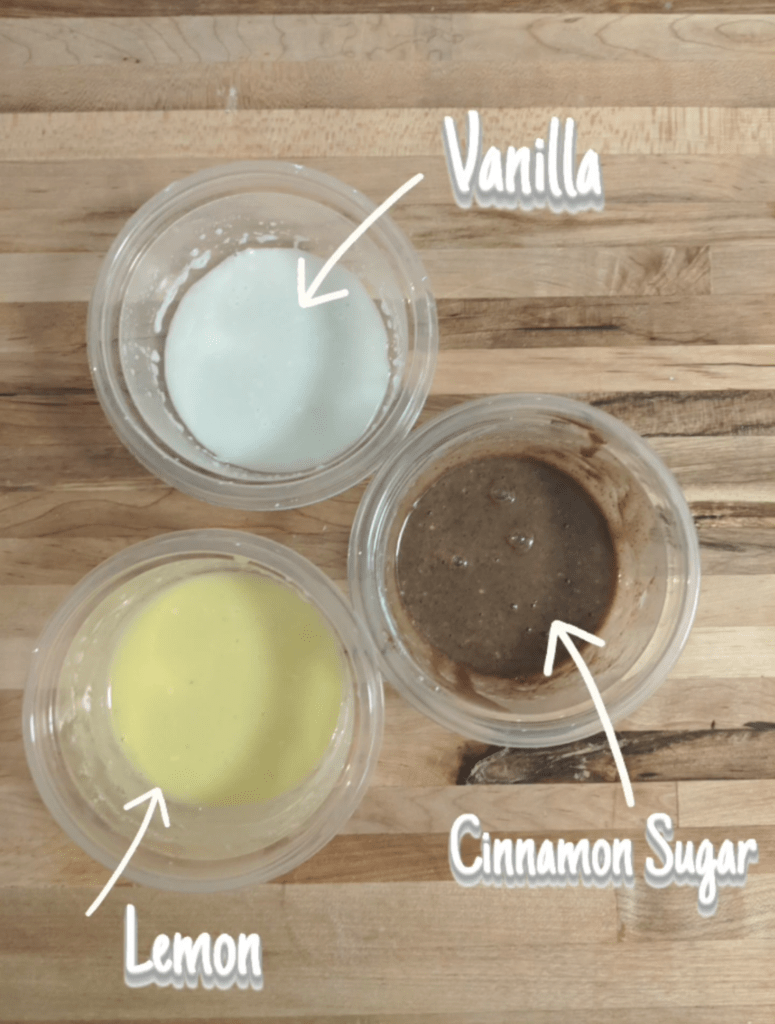
After they set up again in the fridge they were ready for the oven! As the baked almost twice the amount of time that the recipe instructed. This was the day I discovered how off my oven is! So while they baked I made the frostings. You can do it two ways. Make a thicker icing and then flood it or do it the way I did and just make the loose frosting. I think if I was going to serve these to guest and not just my husband I would have done the flooding method. I made the classic white (vanilla) frosting, lemon, and cinnamon sugar. The recipe they provide does include how to make sprinkles, but at 11 o’clock at night I wasn’t about to make homemade sprinkles today!
With the Pop tarts out of the oven the only thing to do is ice and film my submission video! I have to say I tried all of them and of course I am bias and think the chocolate is the best. My husband personally liked the lemon blackberry out of the lot. I have to say that I would for sure try this again and make it for myself and others! Give it a go and have some fun toasting your own pop tarts in the morning! Or maybe try freezing them, does anyone else remember doing that? Bon Appetit!
I don’t know about you guys, but going from cooking a quick and simple on the go breakfast, hopefully having a lunch packed the night before, and then getting creative some nights out of the week in the kitchen to this drastic change of cooking in the kitchen every 6 hours. That takes a lot of energy, mental thought, and groceries. For the at home chef in me going from finding joy in having time to get more experimental in the kitchen a few times a week too wanting to avoid it at all cost by the time dinner rolls around is a big change. I know I am not the only one out there that is thinking the same thing. I also don’t have expendable income to just ubereats every other meal, I mean maybe if I budget right, but that’s not nearly as healthy or cost affect as cooking at home. Especially, since Josh and I love to cook!
So I am racking my brain on ways to make cooking more exciting for the both of us in the home. This isn’t a new idea or challenge. If you search around on the internet you can find variations around, but this is what we went with. I say we, but he didn’t know about it until I presented him with the rules and box.
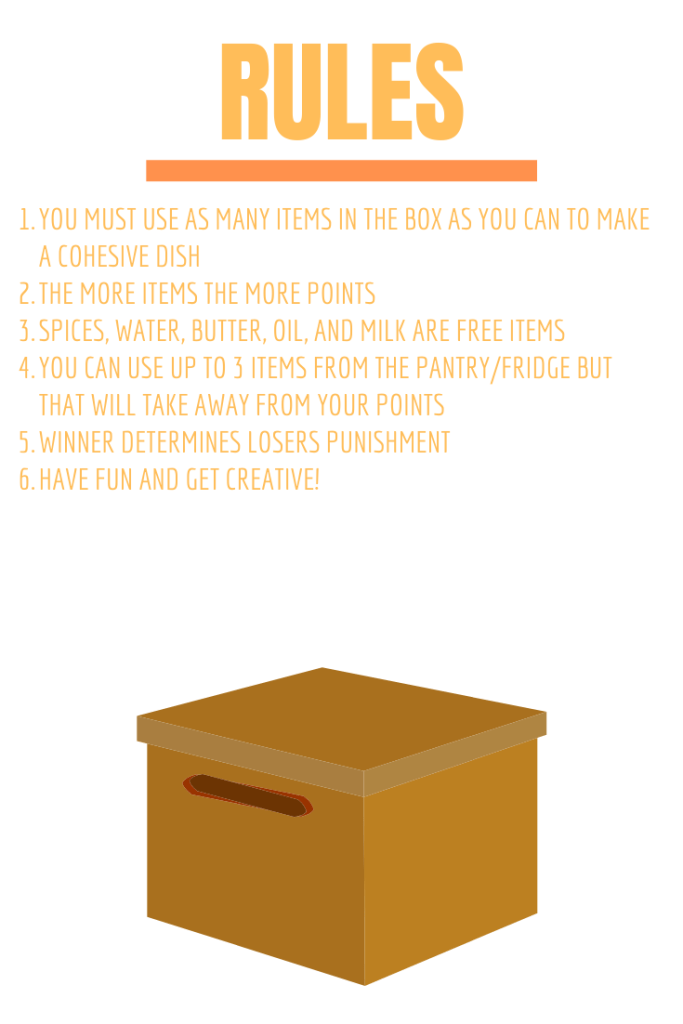
If you have never seen Chopped, let me backup a few minutes and explain to you the premise of the show. Four chefs call on their culinary skills as they face off against one another to prepare a spectacular three-course meal consisting of an appetizer, entree and dessert. The catch? In each round, they have to use all the ingredients the show provides them, however unlikely they might be (Gummi Bears, anyone?). At the end of each course, a panel of three guest judges “chops” one chef who fails to measure up in terms of taste, presentation and creativity. The last chef standing takes home bragging rights and a cool $10,000.
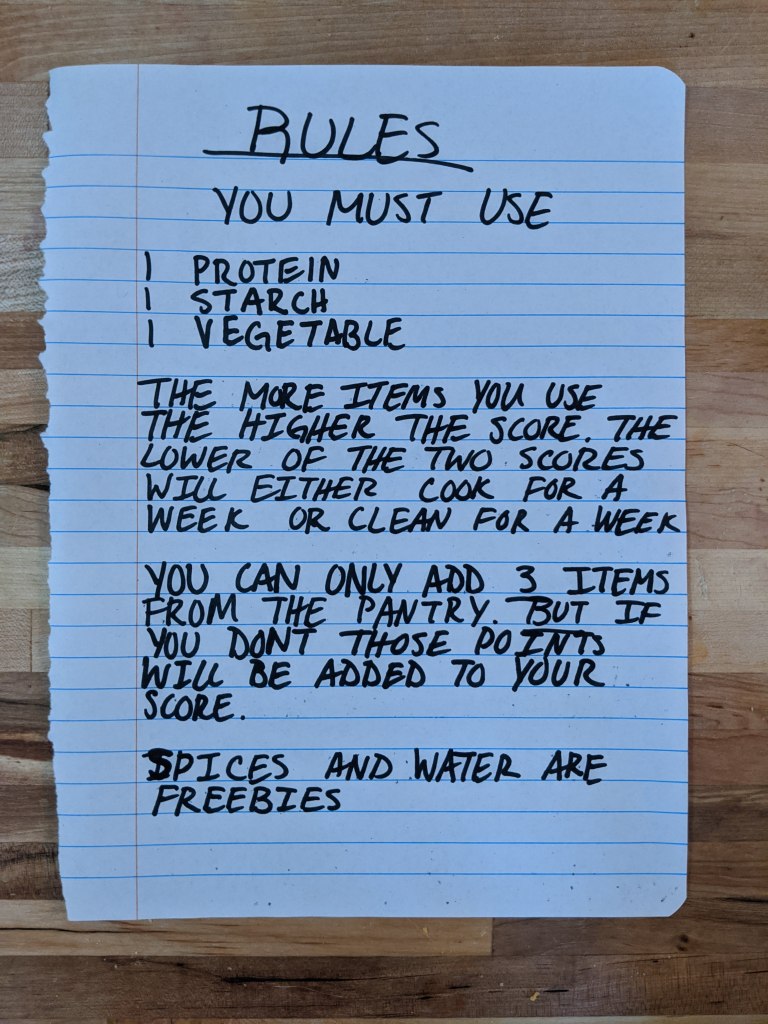
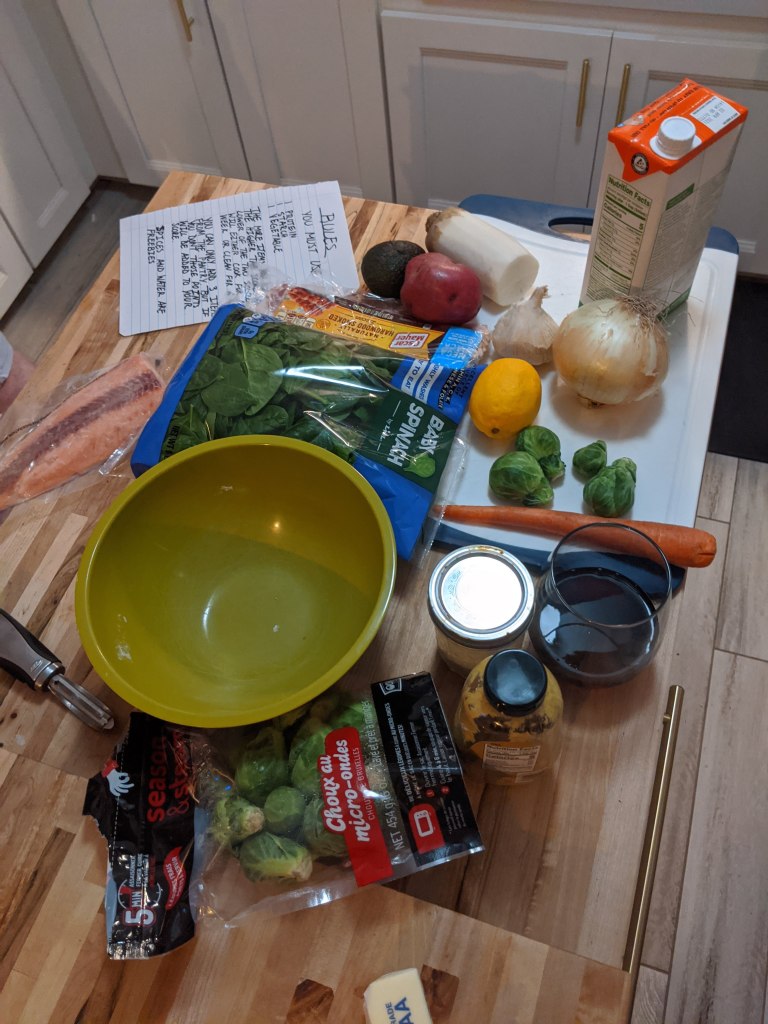
The only differences are: We are two ameture at home chefs. The judges are each other and a point based scale. We weren’t make three courses. No money, but winner doesn’t have to do dishes or cook for a week! In the rules you can see that for every item he uses out of the box he gets point and if he doesn’t use any ‘extra’ items from the pantry or fridge he can add those addition 3 points to his final score. So what is in the box?
Some leftovers, odds and ends from the pantry, a little of everything. This is a GREAT way to clean out and organize not only your fridge but you pantry. A perfect way to not let items go to waste, but reinvent them into something else!
With that I poured him a glass of chef’s juice and left the kitchen to him. As the judge I wanted to be surprised by his meal. So I poured myself a glass of judge’s juice and sat down in the living room awaiting whatever was to come out of the kitchen. About an hour later dinner was ready!
What we have here is bacon wrapped brussel sprouts, wilted spinach, carrots, onion with a hummus vinaigrette dressing, a herb seared piece of salmon, With a side of roasted corn, thinly slice potatoes tossed in a smoky spice blend, and a grilled half avocado. This dish scream a little Tex-mex to me. Not sure if it is the smoky bacon potato with the grilled corn and avocado or what, but all in all it was a delicious dish! He in total ended with 15 points!
Now it was my turn! The battle was on! What I started with on the right and what I narrowed it down to on the left.
I have to say with no time limit, THANK GOODNESS, I still managed to stare down at my supplies for some time before coming up with a plan of action. I had the added knowledge of going second and knowing how many items I needed to use to beat him. I can tell you I DON’T LIKE DOING THE DISHES!
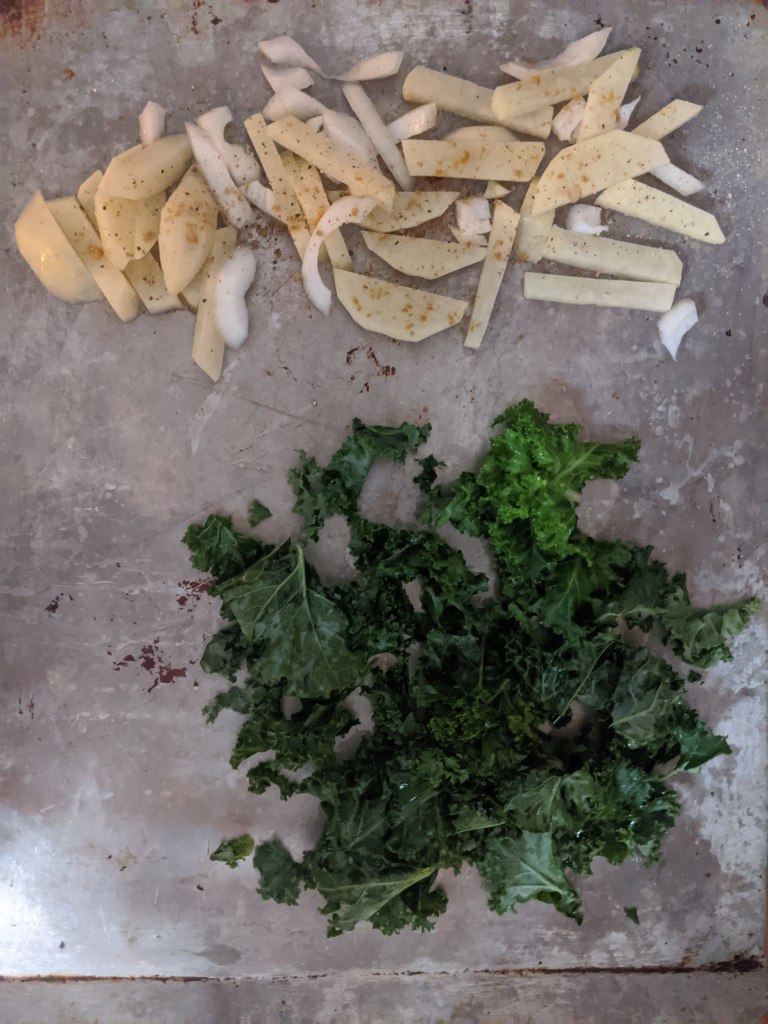
I started with pooching the salmon fillet in a chicken broth, minced garlic, and diced onions. On pan number one I have kale that I plan to turn into a chip and potatoes seasoned with cayenne, salt, pepper, garlic, and chopped onions. Pan number two we have two slices of bacon and a rough chopped cauliflower dusted with a smokey season blend. I am hoping for the bacon fat to flavor the cauliflower even more. In the pot on the end I have onion, tomato, and garlic simmering to turn into a sauce later.
Making homemade tortillas is something to learn. I have yet to make it just right, but i am on my way. I personally use corn meal flour not all purpose flour so it isn’t going to be that white tortilla you see in the grocery store. I have only made this recipe once and previously I followed the recipe to a T and only added salt. Well this time I went in with some extra seasons because I felt with such an easy vehicle for flavor.
When rolling out the dough, know that it is a wet dough. I found it easiest to roll the tortillas out between two pieces of cling wrap to get the best large tortilla. If you are having a hard time sticking to the round shape, use a pie pan! They do a great job at starting it off and from there using a rolling pin. I try to get it under a ¼ of an inch or thinner for the tortilla. We have the cast iron grilling on one side and flat top on the other buried among out oven pans that we only really use during the summer time. (bottom right photo) I thought why not? It’s not summer, shoot, it’s not even sunny out, but I can get some nice grill marks on my tortilla! You can also use a pizza stone in the oven set at 350 flip after 2 minutes or a standard frying pan at medium heat 2 to 3 minutes a side.
With the pan hot I started to go a little crazy and was reheat and searing everything on the griddle plate! Fish, you bet! Potatoes, they could use some more color! Bacon and cauliflower, why not at this point.
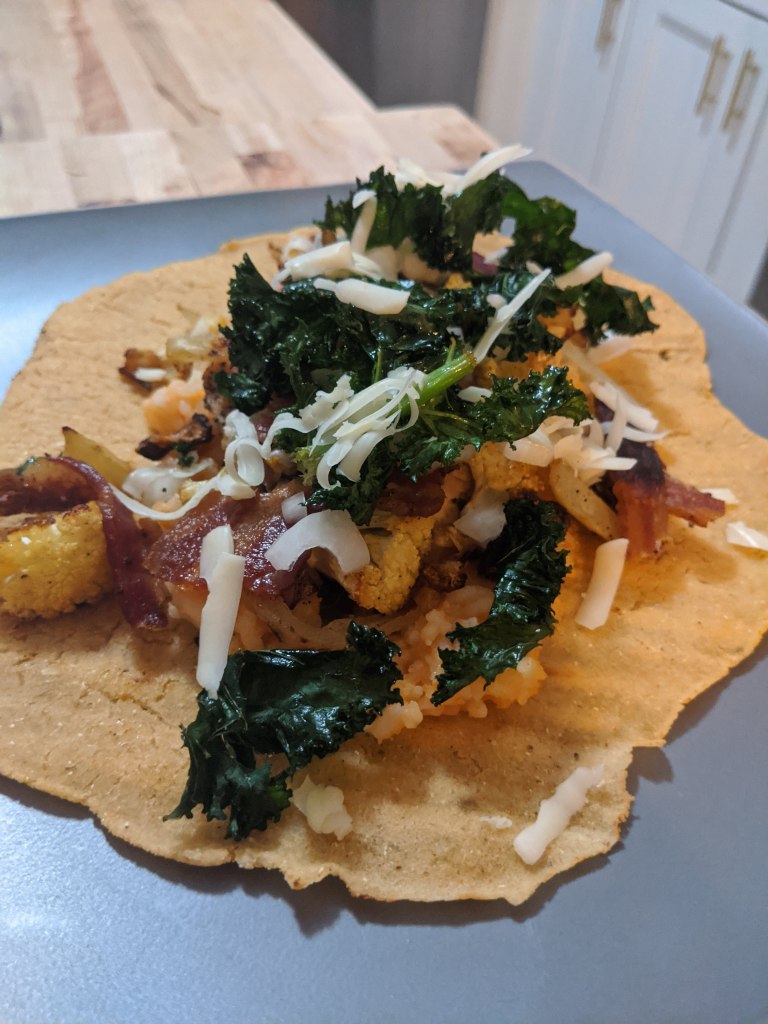
I made a seared salmon soft taco with spanish rice, smokey, crisp bacon cauliflower, crunchy potato fries, baked kale chips, and mild white cheddar with a pico on the side minus cilantro. Yes, I know that can be a make or break for some people. I am allergic to cilantro and a great alternative for those of you, who like me have an allergy or just think it taste like soap: Thai basil. In the current climate I didn’t find it an essential to have in my house so tomato, onion, and lime it is!
I came up with this idea on a whim. I also thought it would be a fun way to break up the monotony of ‘what is for dinner?’ every night. We love to experiment with flavors and foods and this created a way to get experimental within restrictions. We have agreed that we want to do this again before we go to the grocery store and really make our food stretch. What better a time to do that than now?
We are also those people who have moved a box of lasagna to three different apartments. Plus, this was my first fish taco, EVER! I know, I know, world get off my back, but I am just discovering fish. It has opened a whole section of the menu for me.
Going forward we have talked about doing the same challenge again but maybe setting a theme with the spices or inspiration from a certain country, adding a time limit, or adding a course. That one is my favorite idea! I’d love to add on an appetizer one week and then dessert the following until we are cooking a three course meal!
Now the real thought running through your mind is ‘who won?!’. Well that would be me! 16 baby! My lucky number!
Here are two templates you can print off at home to surprise your roommate, spouse, or partner! Enjoy and maybe find some excitement in the kitchen again. Plus, you can get rid of that can of creamed corn you bought two years ago when you meant to buy regular corn.
I don’t own the rights to the logo design in my featured image. That belongs to Food Network and Chopped.